How to connect an analog control system directly to MIC IP serial port?
OVERVIEW
Analog control system connected directly to the MIC IP serial port. The serial com ports of traditional analog systems head end control systems connect directly to the RS485 input of the MIC IP models listed below.
APPLICABLE PRODUCTS
- Camera model: MIC IP starlight 7000i, MIC IP ultra 7100i, MIC IP starlight 7100i and MIC IP fusion 9000i
- Platform: CPP 7.3
- Supported firmware version is 6.43.0027 and above.
- The supported protocols are Bosch OSRD, Pelco P/D, Forward Vision, and Cohu
- Serial Protocol license MVS-FCOM-PRCL is required for the camera.
NOTES:
- This method cannot be used with the AUTODOME.
- The camera application variant cannot be configured as IO model eg. MIC IP starlight 7000i - IO
- This is considered a hybrid operation since the cameras can still be controlled over IP.
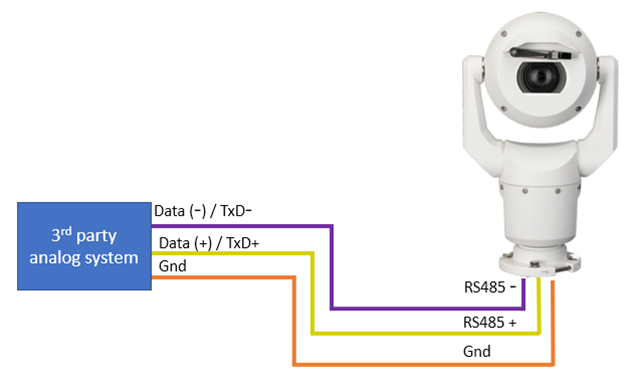
Wiring Connections
Supported protocol commands:
Protocol : BOSCH OSRD
The Operation Manual for each IP camera lists the applicable commands that are supported.
Protocol : Pelco D & Pelco P
These basic commands are supported:
Pan Right, Pan Left, Tilt Down, Tilt Up, ZOOM in, ZOOM out, Focus Far, Focus Near, Auto Iris, and Manual Iris.
In addition, these special Presets and AUX commands are available.
Pelco Keyboard | User Action | Description |
33 – Preset | Press | Pans the Camera 180° |
34 – Preset | Press | Moves to the Factory Home position |
81 – Preset | Press | Initiates the Camera’s standard Preposition tour (Tour 1) |
82 – Preset | Press | Initiates the Camera’s custom Preposition tour (Tour 2) |
96 – Preset | Press | Stops AutoPan |
99 – Preset | Press | Initiates an AutoPan |
1 – Pattern | Press and hold (2 secs.) | Start Recording Tour A. Press ACK to end recording. |
Press | Activate continuous playback of Tour A | |
2 – Pattern | Press and hold (2 secs.) | Start Recording Tour B. Press ACK to end recording. |
Press | Activate continuous playback of Tour B | |
3 – Pattern | Press | Initiate the Camera’s standard Preposition tour (Tour 1) |
4 – Pattern | Press | Initiate the Camera’s custom Preposition tour (Tour 2) |
1 – Aux On / Aux Off | Press | Activates Wash/Wipe for MIC IP camera (Preposition 62 must be saved first as the Wash Position) |
2 – Aux On / Aux Off | Press | Activates/Deactivates One Shot Wiper for MIC IP camera |
3 – Aux On / Aux Off | Press | Activates/Deactivates Continuous Wiper for MIC IP camera |
4 – Aux On / Aux Off | Press | Activates/Deactivates BLC |
5 – Aux On / Aux Off | Press | Not Configured; possible selections are listed as Note 1 |
6 – Aux On / Aux Off | Press | Not Configured; possible selections are listed as Note 1 |
7 – Aux On / Aux Off | Press | Not Configured; possible selections are listed as Note 1 |
8 – Aux On / Aux Off | Press | Not Configured; possible selections are listed as Note 1 |
NOTE 1: Users can remap the 8 AUX commands to some common control commands in the Web GUI.
Web GUI configuration:
Configuration --> Camera --> Pelco AUX Map
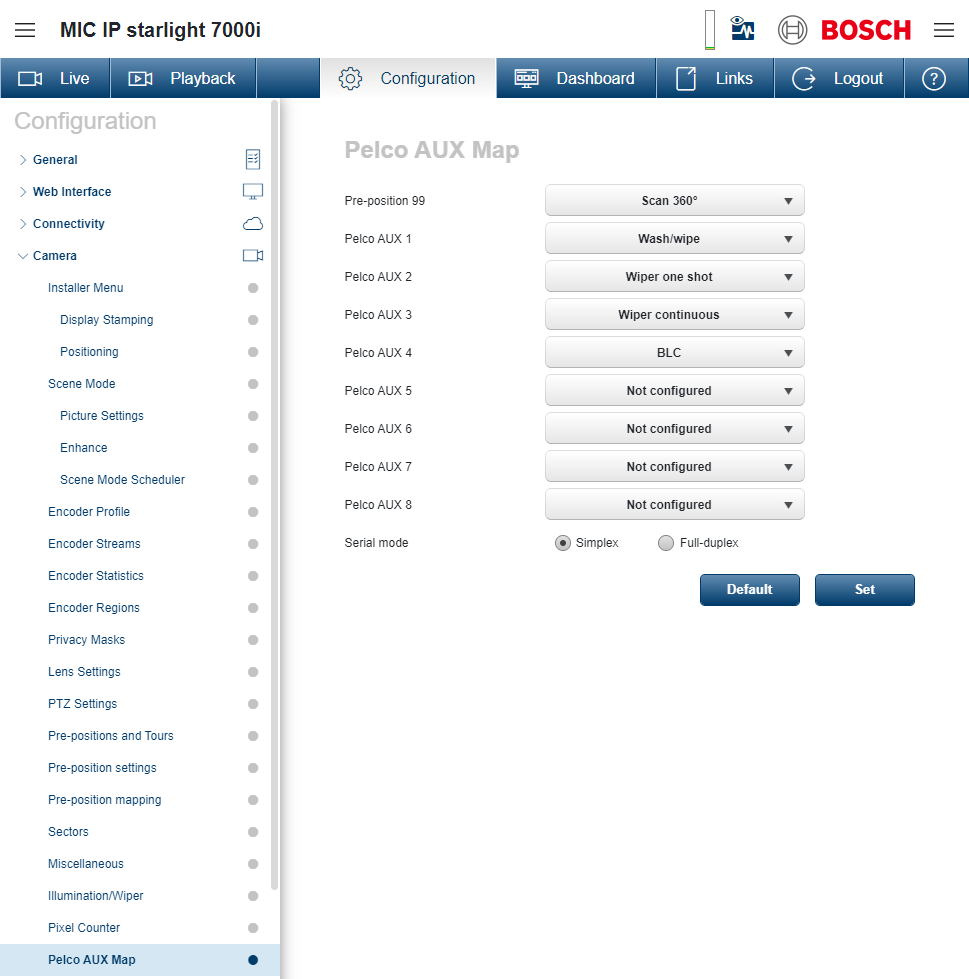
These commands are:
Wash/wipe | IR mode | Night mode auto |
Wiper one shot | BLC | White light |
Wiper continuous | AGC | Intelligent defog |
Wiper intermittent | Night mode | Intelligent tracking |
Pelco D – Extended Commands
Pelco offers what they refer to as “Extended Commands”. Only the following six absolute position commands are supported.
Pelco D | Description |
0x4B | Set Absolute Pan Position |
0x4D | Set Absolute Tilt Position |
0x4F | Set Absolute Zoom Position |
0x51 | Query Pan Position |
0x53 | Query Tilt Position |
0x55 | Query Zoom Position |
NOTE: Bosch is not responsible for providing the complete Pelco D protocol documentation. The complete Pelco D protocol guides are only published by Pelco.
Protocol : Forward Vision
Forward Vision Keyboard Command | User Action | Description |
87 – Preset | Press | Activate continuous playback of Tour A |
88 – Preset | Press | Stop Recording Tour A or Playback of Tour A |
89 – Preset | Press | Start Recording Tour A |
90 – Preset | Press | Activate continuous playback of Tour B |
91 – Preset | Press | Stop Recording Tour B or Playback of Tour B |
92 – Preset | Press | Start Recording Tour B |
10 – Program | Press | Toggle OSD On/Off |
17 – Program | Press | Slow Sequence Set (60 seconds) |
18 – Program | Press | Fast Sequence Set (10 seconds) |
19 – Pattern | Press | Start custom tour |
Wipe On / Off | Press | Activates/Deactivates Continuous Wiper for MIC IP camera |
Wash On / Off | Press | Activates Wash/Wipe for MIC IP camera |
Lamp On / Off | Press | Activates/Deactivates IR lamps for MIC IP camera and Night Mode On/Off at the same time |
Aux On | Press | Enables Digital Zoom |
Protocol : Cohu
Only the basic PTZ, Focus, and Iris commands are supported.
Step-by-step guide
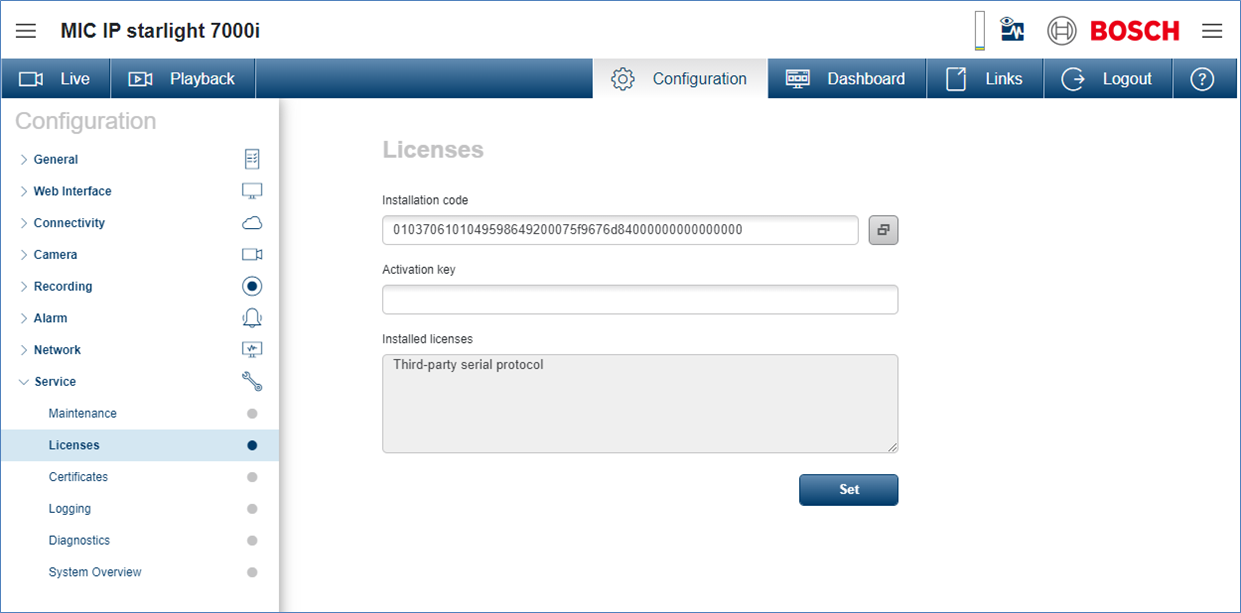
Step 1: Enable the 3rd party serial protocol license on the IP camera
Ensure that the 3rd party serial protocol MVS-FCOM-PRCL license is activated on the camera.
The camera will reboot once the activation key is set on the camera.
Web GUI configuration:
Configuration --> Service --> Licenses
Step 2: Service password unlock
Due to the improved security features in 6.4x and higher, the camera requires a RCP CGI command to unlock the service password.
Default setting: service password locked
RCP CGI:
service password unlock
http://<ipaddress>/rcp.xml?command=0x0b1a&type=T_OCTET&direction=WRITE&num=0&payload=1
* replace <IPAddress> with the camera IP address
Step 3: Protocol type selection
The protocol selection is saved so that a power interruption will not cause a loss in communications.
Default protocol: Pelco D
RCP CGI:
Bosch OSRD
http://<IPAddress>/rcp.xml?command=0x09a5&type=P_OCTET&direction=WRITE&num=1&payload=0x80000201D5020001
Pelco P
http://<IPAddress>/rcp.xml?command=0x09a5&type=P_OCTET&direction=WRITE&num=1&payload=0x80000201D5020002
Pelco D
http://<IPAddress>/rcp.xml?command=0x09a5&type=P_OCTET&direction=WRITE&num=1&payload=0x80000201D5020003
Forward vision
http://<IPAddress>/rcp.xml?command=0x09a5&type=P_OCTET&direction=WRITE&num=1&payload=0x80000201D5020007
Cohu
http://<IPAddress>/rcp.xml?command=0x09a5&type=P_OCTET&direction=WRITE&num=1&payload=0x80000201D5020008
* replace <IPAddress> with the camera IP address
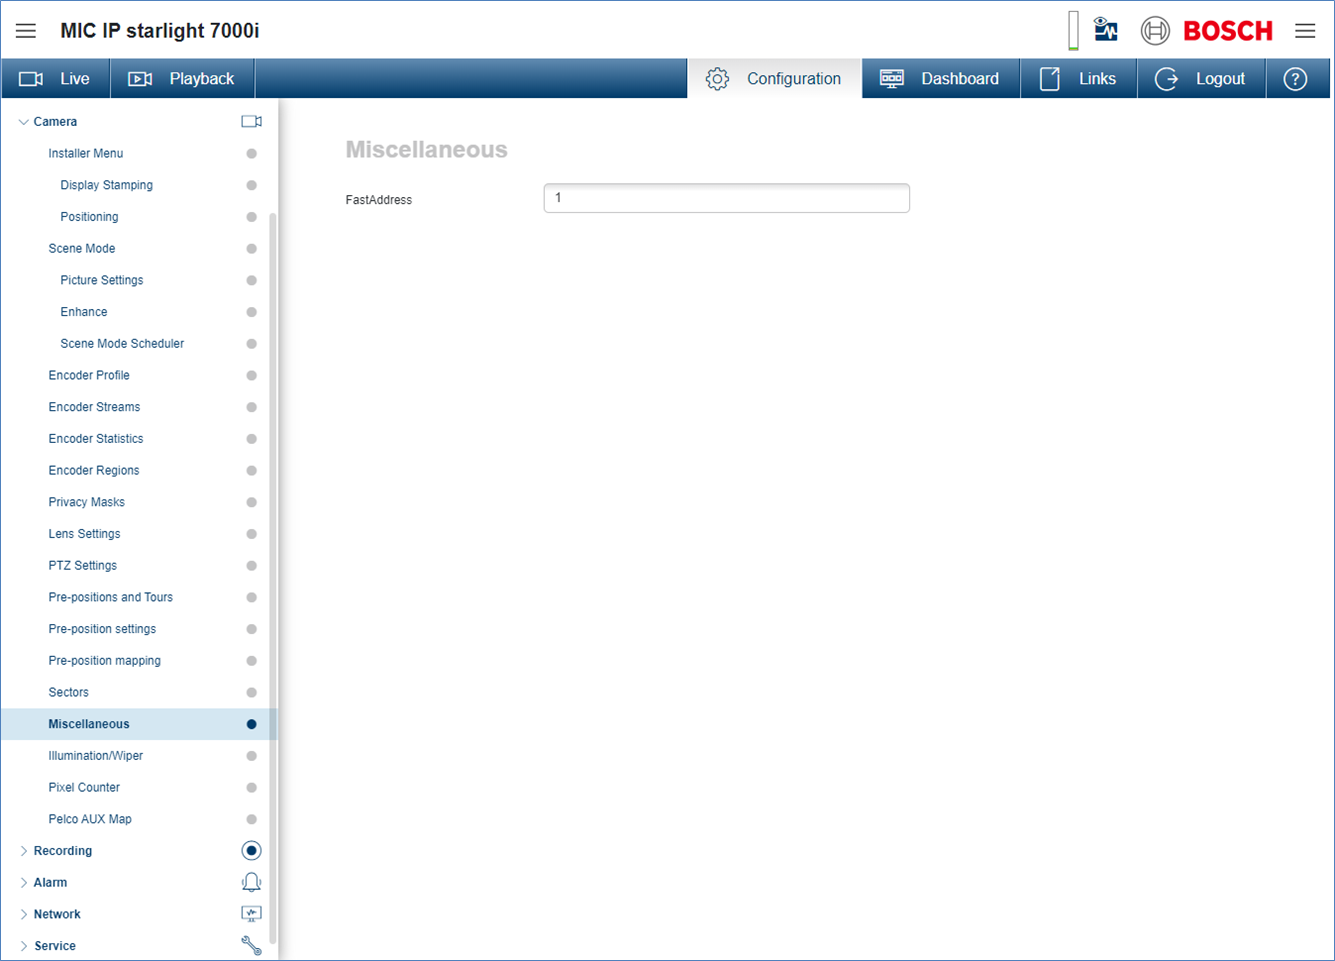
STEP 4: Configure the fast address
A FastAddress (analog device ID) is required for the analog system to control the camera. This set address must match the camera number that is used on the Keyboard or the analog control software. The range is from 1 to 9999.
In the Web GUI, navigate to Configuration --> Camera --> Miscellaneous and enter the FastAddress of the camera’s analog device ID.
For example, Camera 10 on an Allegiant Matrix Switcher keyboard would be equal to 10 in the GUI.
Web GUI configuration:
Configuration --> Camera --> Miscellaneous
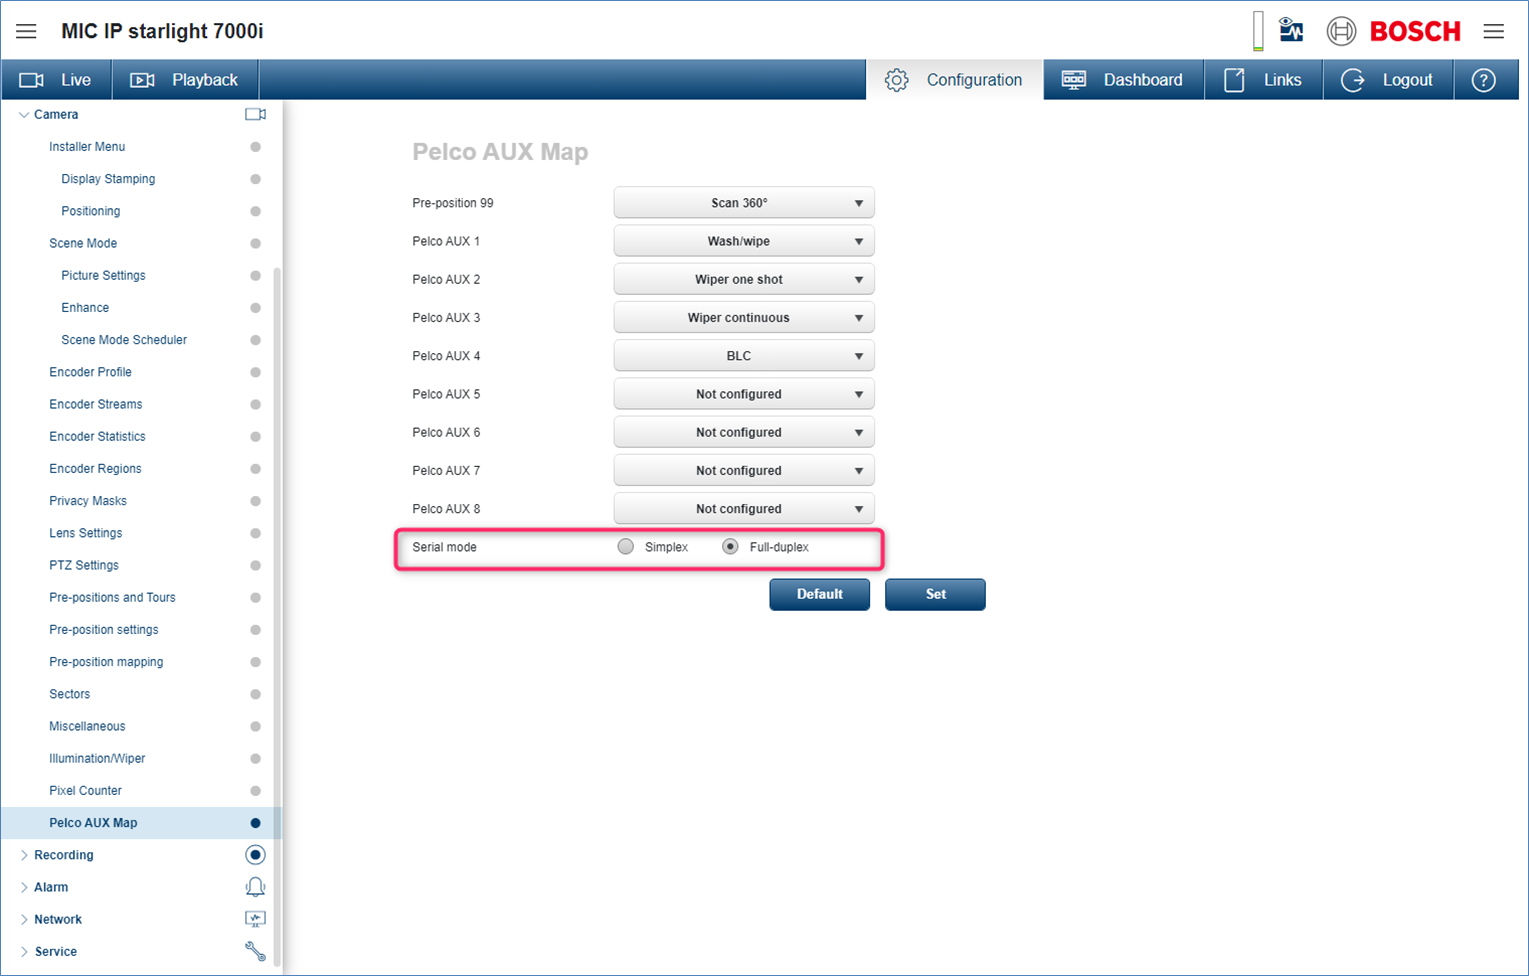
STEP 5: Serial mode
For receiving the RS-485 feedback from the camera communication port, Full-duplex needs to be selected.
The MIC IP camera needs to be operating on firmware version 7.86.xxxx and above in order for the analog control system to receive the RS-485 feedback.
Web GUI configuration:
Configuration --> Camera --> Pelco AUX Map