
How to set up, count with IVA Pro & FW 9.40 and get the data from the camera?
🕦 This procedure takes in average ~5 min to complete
📚 Overview:
Introduction
1.1 Which camera and IVA Pro to use?
1.2 What can be counted?
1.3 LimitationsPlanning camera setup
2.1 Perspective: Why top-down or birds-eye view is preferred
2.2 People counting best practices: Planning camera field of viewSetup
3.1 Ensure that IVA Pro Buildings is selected
3.2 Set up your counting task: Counter / Occupancy
3.3 Resetting Counter
3.4 Moving counting labelsAccessing the counter data
4.1 RCP+, VCD, ONVIF, MQTT
4.2 Remote Portal: IP Camera Counter Report
1. Introduction
This technical note describes how to count with IVA Pro, what the best camera and perspective are, how to set it up, how to get the data from the camera, and what the best practices are.
Step-by-step guide
1.1 Which camera and IVA Pro to use?
For people counting, the recommended camera and IVA Pro version is the FLEXIDOME panoramic 5100i with IVA Pro Buildings, as this is the only combination that supports top-down/birds-eye views with AI detection performance. Top-down views will deliver the best performance due to minimizing occlusion, see Section 2.1.
When not using a top-down view for people counting, then IVA Pro Buildings, IVA Pro Appearance and IVA Pro PPE can be used equally. Note that it is not possible to use the extra attributes from IVA Pro Appearance or PPE with the counting.
For general vehicle counting, IVA Pro Buildings can be used as well, though if cars are to be counted separately from bicycles, motorbikes, trucks, and busses, then IVA Pro Traffic is needed.
While technically it is still possible to set up counter with IVA Pro Perimeter, it is not recommended to do so as IVA Pro Perimeter is designed and optimized for long-distance professional intrusion detection and not for crowded scenes. Also, IVA Pro Perimeter will lose track of objects standing still for a long time.
Note that counting with IVA Pro can be combined with IVA Pro Privacy, delivering counting metadata and alarms while protecting the privacy of the people in the scene. In that case, it is recommended to use a static blurring mask over the full image. Further information about IVA Pro Privacy and its setup is available in its own whitepaper.
1.2 What can be counted?
Via the GUI, two dedicated counting tasks are available:
Counter:
Count all objects crossing a specified line
The line can consist of up to 16 nodes or 15 segments
An alarm can be raised if the counter reaches a maximal value and should be reset via RCP+
Occupancy:
Count all objects currently in a specified field
The field can have up to 16 nodes and edges
An alarm can be raised if a predefined threshold is reached
Both counters can be applied to arbitrary objects and restricted according to the general object’s properties, e.g. by the object class to separate vehicles from pedestrians. They cannot be combined with the extra attributes from IVA Pro Appearance and IVA Pro PPE like gender.
Via the VCA task script language, counter can be applied to any event (like entering a field) defined there and any object state possible. It is also possible there to define a virtual room inside a single camera via up to three entry and exit lines. See the tech note on VCA task script language for further details and examples.
1.3 Limitations
Objects that are occluded by more than 50% will not be counted.
Top-down/birds-eye view for people is only supported with IVA Pro Buildings on the FLEXIDOME panoramic 5100i.
Top-down/birds-eye view vehicle counting is not supported.
Counter cannot be combined with extra attributes from IVA Pro Appearance or IVA Pro PPE.
Children may not be counted correctly due to their smaller size.
2. Planning camera setup
2.1 Perspective: Why top-down or birds-eye view is preferred

Front view:

Many people are occluded by other people
Very hard to detect and separate people in the rear
Position in the room cannot be determined
Not usable for counting at all

Slight tilting:
People are mostly occluded
Very hard to detect and separate people in the rear
Position in the room very ambiguous
Not usable for counting at all

More tilting:
People are partly occluded

Position in the room can be determined
Human can count here manually
Automated computer counting limited by people density

Top-down/birds-eye view:
All people can be seen and separated easily
Position in the room easy to determine
Max. quality of the counting results
2.2 People counting best practices: Planning camera field of view
Checklist | Comments |
|---|---|
Use birds-eye view if possible | See the previous chapter for explanation. Note that performance will decrease the more the camera view differs from birds-eye view (90° tilt angle). |
Camera height >3m (also depending on camera lens) | Less height and the people walk through the observed area too fast to be detected and counted properly. |
No reflecting surfaces | Reflections of persons move with them and might be counted falsely. |
Max number of persons in scene at once: 64 | If more persons are in the camera scene at once, real-time performance can no longer be guaranteed. This means that single frames might be dropped, though object tracks will be continued. This may lower overall performance. |
Use straight passageways where possible | Avoid scenes where people enter, directly turn around a corner and immediately leave the camera image before the algorithm had a change to detect and track them robustly. Avoid scenes where people loiter and thus cross the counting line several times. |
3. Setup
Setup will be shown for IVA Pro Buildings. Setup for IVA Pro Traffic, IVA Pro Appearance or IVA Pro PPE will be similar, as all selections and tasks from IVA Pro Buildings are available there as well. Setup needs to be done in Configuration Manager 7.74 or higher.
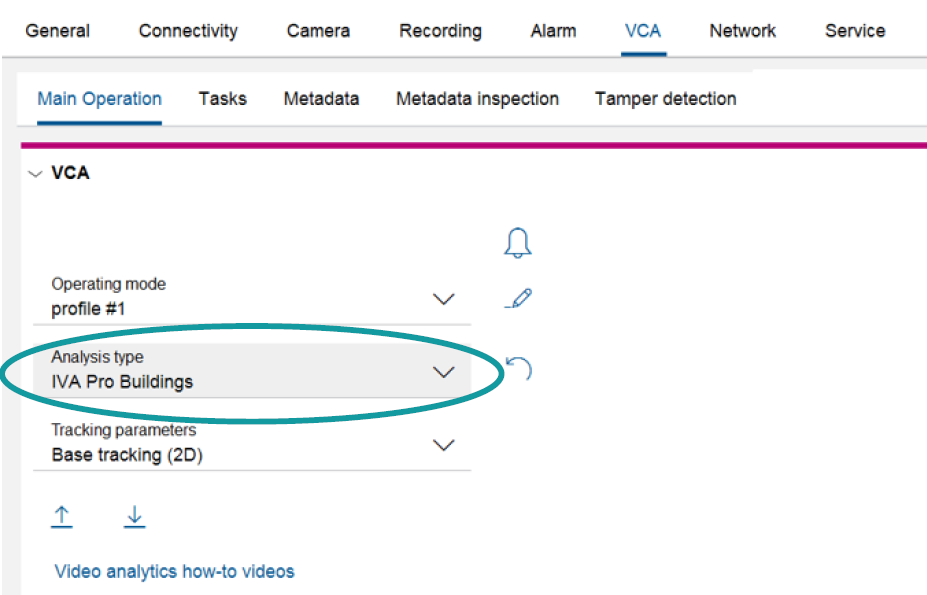
3.1 Ensure that IVA Pro Buildings is selected
IVA Pro Buildings is available free of charge and preinstalled as default IVA Pro version. In the Configuration Manager, select the camera, then go to VCA → Main Operation. Ensure that IVA Pro Buildings is selected in the Analysis type. Only one tracking mode is available and kept.
3.2 Set up your counting task: Counter / Occupancy
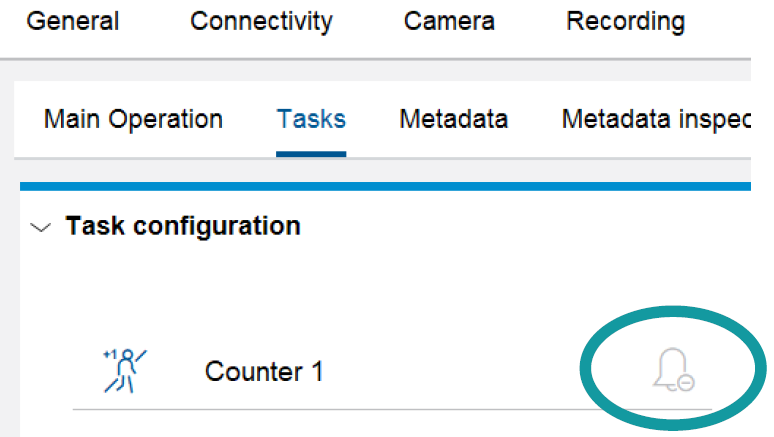
Go to VCA → Tasks. The default task is Detect moving objects. Select the task by clicking on it, then click the trash can button to delete it. Single click on an already selected task allows to rename it, and double click opens the task wizard.
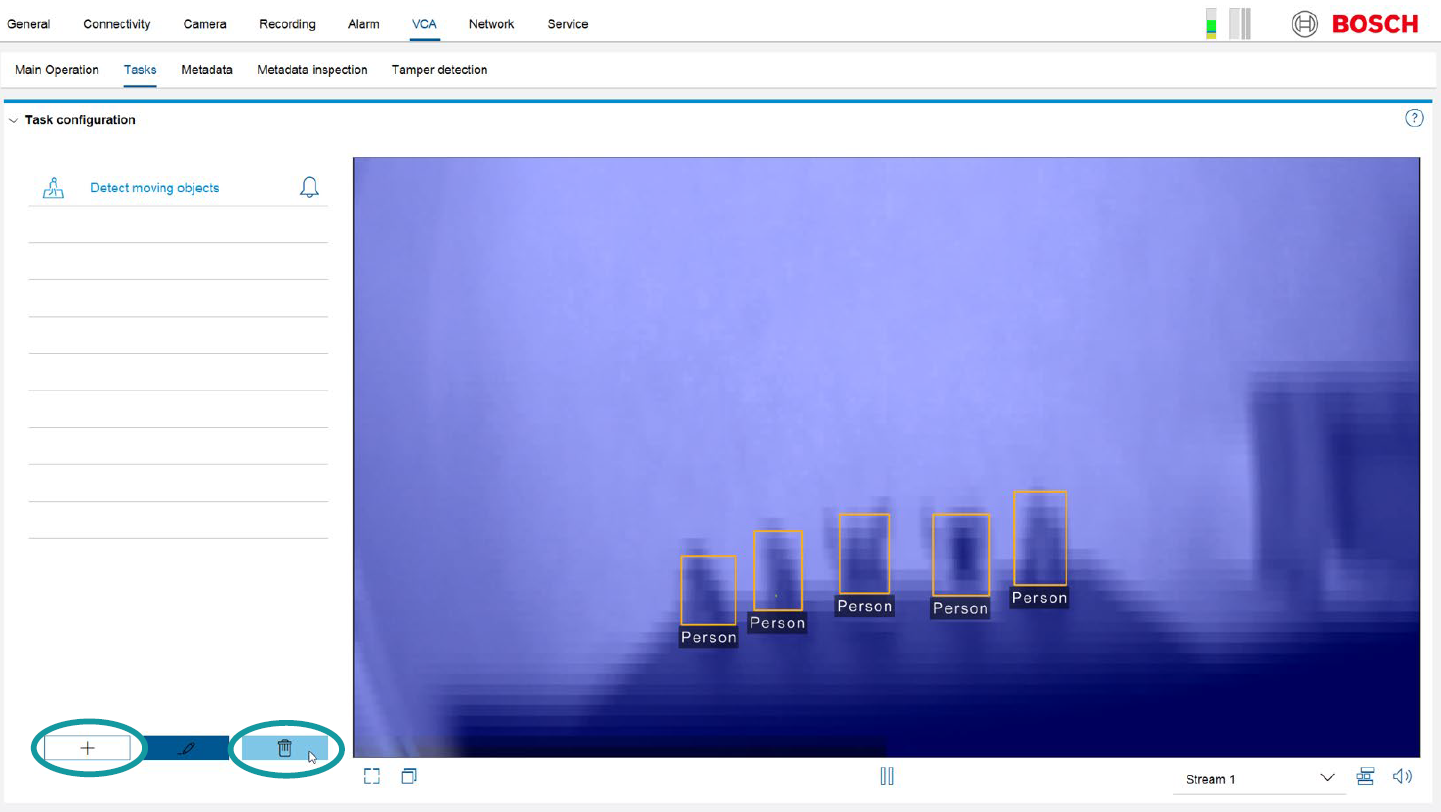
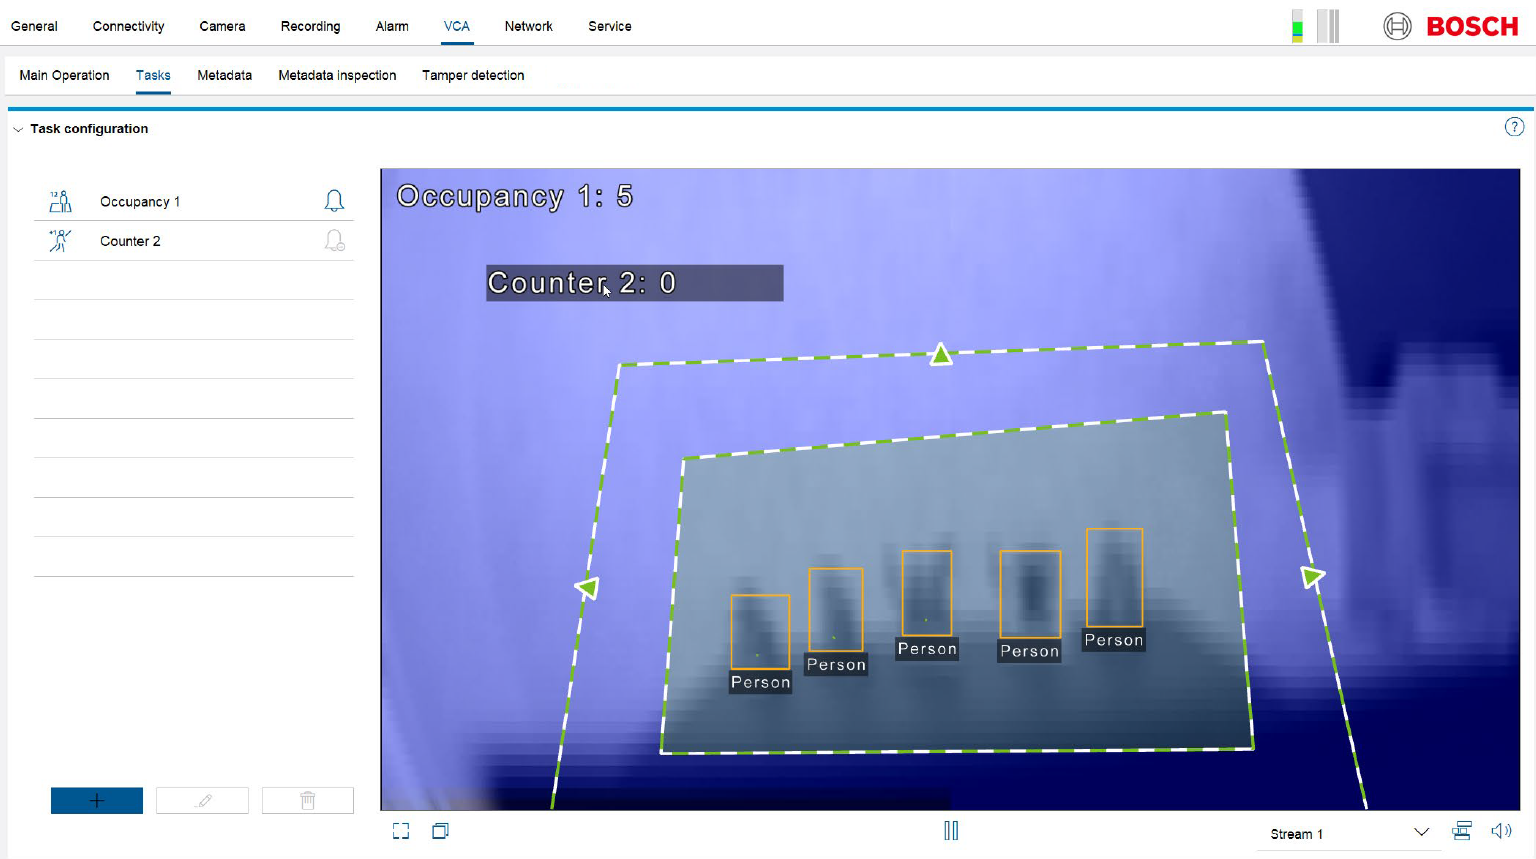
Select the new task by clicking on the + button and choosing either Counter for counting objects crossing a multi-segment line or Occupancy to count all objects inside an area from the task list that appears.
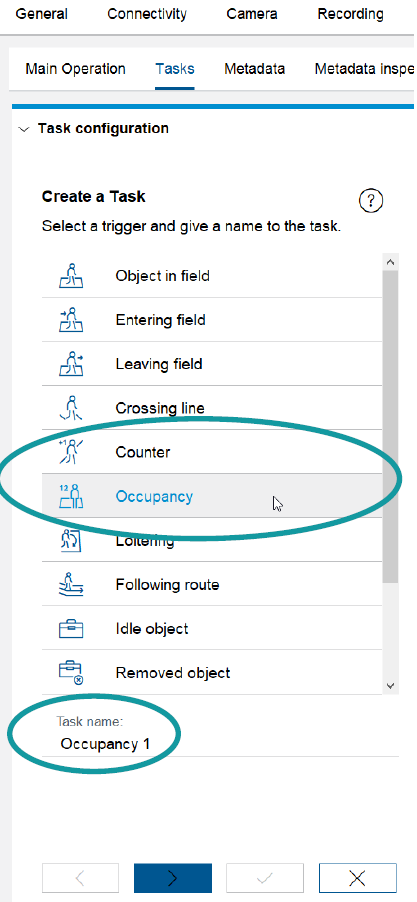
You can name your task on this page directly, or on the task overview page later with a single click on the task name.
The Counter task asks you to draw a multi-segment line next. The line can have up to 16 nodes or 15 segments between these nodes. Click in the image for each node, and double click for the last node to end drawing.
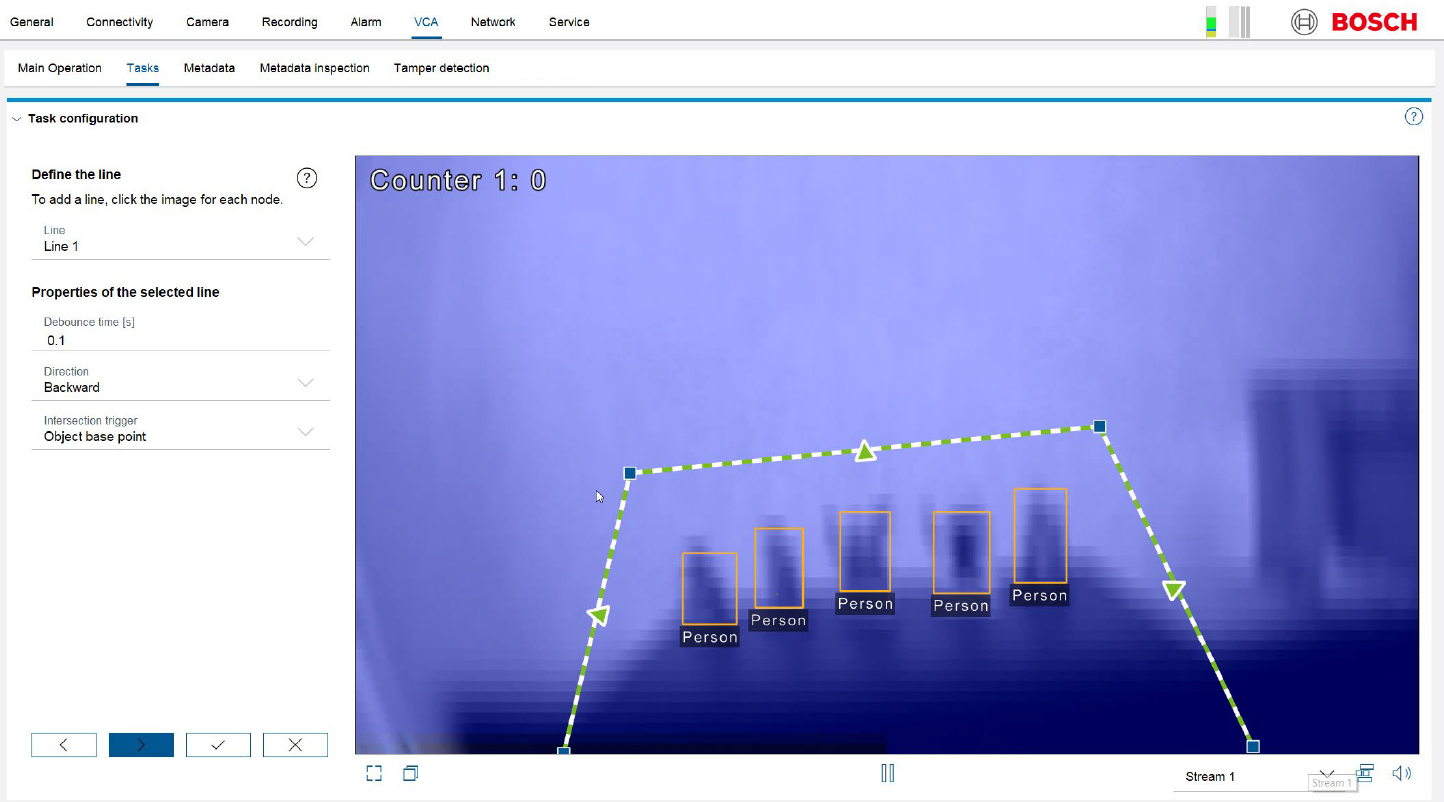
Selected lines show the blue nodes of the line, while unselected lines hide them. To select a line, click on it or choose it from the line dropdown box on the left. It is possible to add a new node in a selected line by double clicking at the location on the segment, or to add and remove a node with the video menu available by selecting the line and right-click on the video. The line can be moved by either moving all nodes separately, or by selecting a line segment and moving the full line.
Select whether the line should trigger when an object crosses in both directions or only in one direction, via the Direction drop-down box to the left. The chosen direction will be shown as arrows on the line segments, with no arrow if both directions should trigger.
Make sure the counting lines are large enough that people can’t slip by. Set the counting lines so that objects can be well detected both before and after crossing the line/field border. This ensures observation of the person crossing the line/field border with the quality needed for high counting accuracy.
Examples | Comments |
|---|---|
 | Line too close to border. Objects entering will not be detected in time to trigger the line. Not suitable for counting. |
 | Enough room before and after the counting line. Objects will be detected with high accuracy before crossing the counting line and the crossing itself will be observed with high quality. Well set up for counting. |
You can now either finish by selecting the check mark button or add further limitations to the objects that should be counted.
Do not worry if the checkbox for the final counter task is not set and can’t be activated. It simply means that the counter will not generate an alarm. You can add an alarm in the counter task wizard if needed. Otherwise, ignore the checkbox − counting will still work.
The Occupancy tasks asks for an area in which to count. This area is a polygon with up to 16 nodes and 16 segments. Click into the image for each node and double click for the last node to end the drawing.
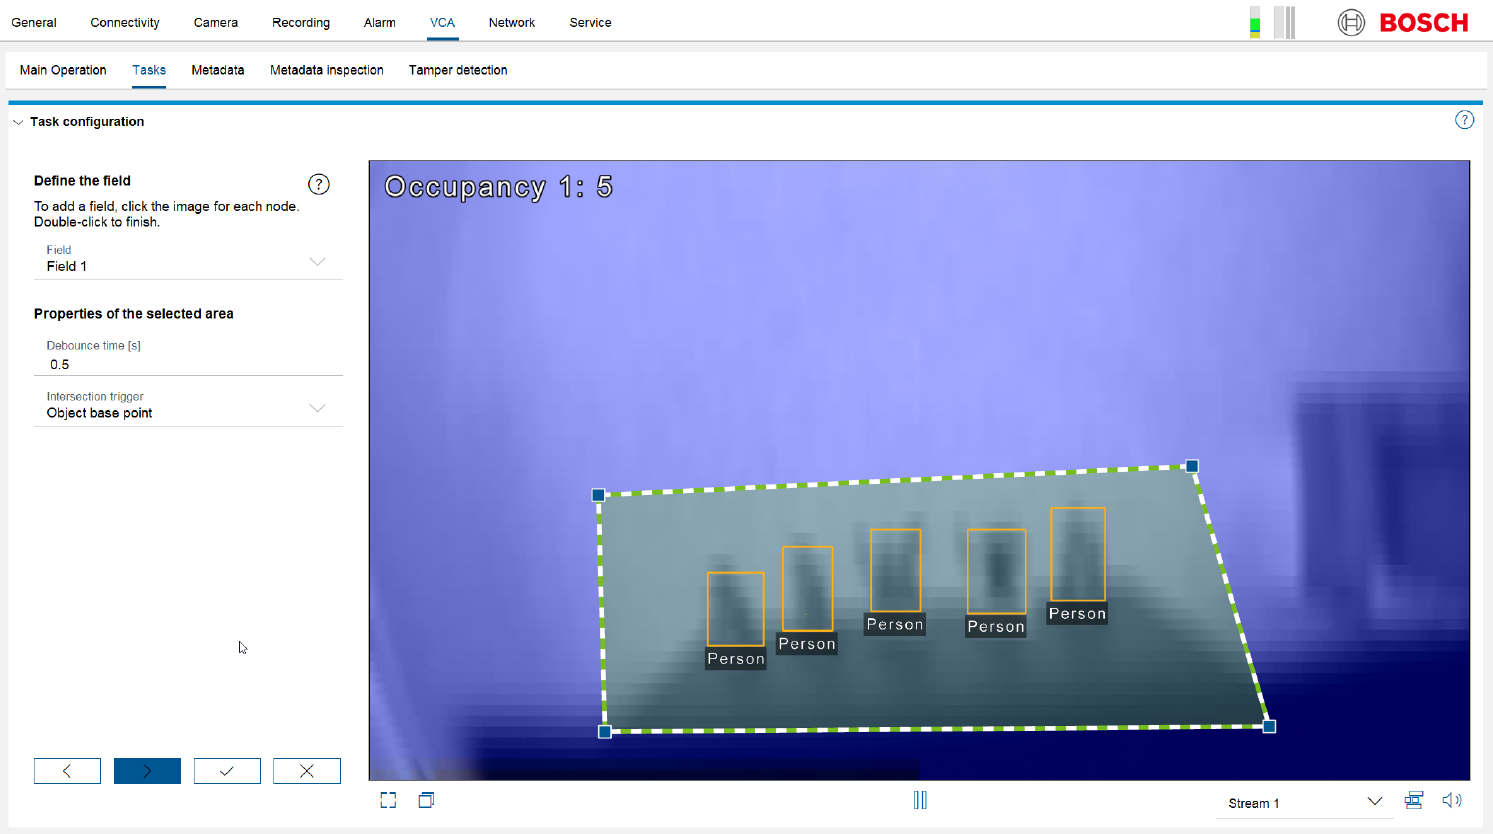
Selected fields show the blue nodes of the field, while unselected fields hide them. To select a field, click on it or choose it from the Field dropdown box on the left. A single segment of the field can be selected as well and will then be shown in solid color. It is possible to add a new node in a selected segment by double clicking at the location on the segment, or to add and remove a node with the video menu available by selecting the segment and right-click on the video. The field can be moved by either moving all nodes separately, or by selecting a line segment and moving it, or by selecting the full field and moving it. Note that the alarm is delayed by 0.5 sec by default. You can change this in the Debounce time setting to the left.
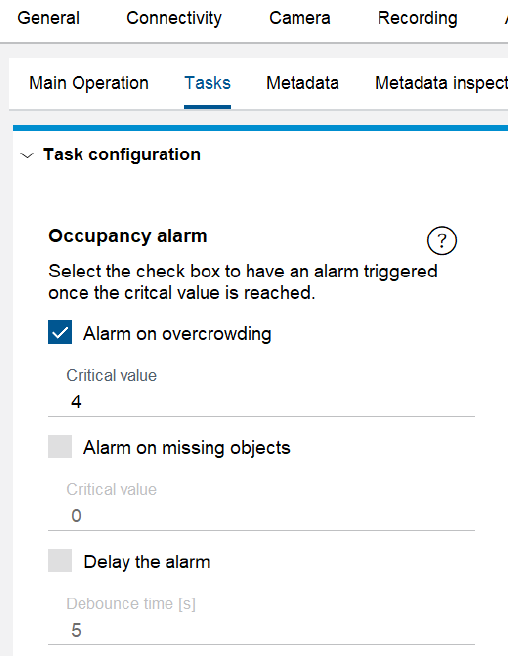
In case the occupancy task should not alarm, you can now either finish by selecting the check mark button or add further limitations to the objects that should be counted. If the occupancy task should alarm, continue to the next page of the task wizard, check “Alarm on overcrowding” and enter the threshold under “Critical value”.
The alarm will now be sent if “critical value” or more objects are in the area, in the example below if more than 4 objects are there.
3.3 Resetting Counter
The counters in the camera can and will be reset in the following ways:
With the RCP command “CONF_IVA_COUNTER_VALUES
By writing an IVA configuration onto the camera
When the counting task has been configured to reset upon reaching a specified value
Note that the CM configuration pages can intermittently show different counter values while changing the configuration there and before uploading the changed configuration into the camera. This is done so configuration changes can be evaluated directly before committing the changes to the camera.
3.4 Moving counting labels
To move a counting label in the Configuration Manager, simply place your mouse over the label in the image, click it, and drag and drop it to the correct place.
4. Accessing the counter data
4.1 RCP+, VCD, ONVIF, MQTT
Remote Control Protocol plus (RCP+) is a remote-control protocol including the ability to send read and write commands to a device, and to subscribe for messages. Defined counters can be read out and reset via RCP+ commands. It is best practice to reset the counter values regularly so they will not generate an overflow of the counter values.
The VCA metadata stream including all detected and tracked objects as well as the counter data is encoded in the proprietary Video Content Description (VCD) Format and fully accessible via Remote Control Protocol plus (RCP+) and Real Time Streaming Protocol (RTSP). Via ONVIF and in the ONVIF metadata description format, a reduced set of the VCA metadata including the events and object bounding boxes is available. As the VCA metadata contains the full information about all detected and tracked objects, this can be used to define further counters or generate heatmaps in any client able to read the VCA metadata. MQTT can be used to transport counting events. For further information on MQTT, see its own whitepaper.
Contact the Integration Partner Program (http://ipp.boschsecurity.com) for a full documentation or exemplary source code.
4.2 Remote Portal: IP Camera Counter Report
Remote Portal offers a licensable IP Camera Counter Report (CBS-CTRRPT-CAM). For more details, see the product page and the IP Camera Counter Report how-to articles.