
See here the Whitepaper_MQTT_FW980.pdf document or follow the article below.
📚Overview:
1. Introduction
1.1 Bosch ONVIF Metadata MQTT format
ONVIF Profile M [1] supports analytics configuration and information query for metadata, as well as filtering and streaming of metadata. With this profile, applications can utilize the metadata for its own customize usage, such as creating a dashboard to shows the total number of persons passing through the walkway or trigger an event when there are too many people in the area. Within ONVIF Profile M implementation is the support for MQTT for communication with an IoT platform or application.
Bosch has implemented the ONVIF Profile M with MQTT support in its cameras in the firmware 7.81.0060 and above [2]. This allows applications and IoT platforms to receive IVA events and counters via MQTT. For details of ONVIF Profile M, visit the webpage https://www.onvif.org/profiles/profile-m/.
With firmware 9.80 [2], properties of objects triggering selected MQTT events have been added (see Section 4).
1.2 What is MQTT?
Citation from official MQTT specification [3]:
“MQTT is a Client & Server publish/subscribe messaging transport protocol. It is light weight, open, simple, and designed to be easy to implement. These characteristics make it ideal for use in many situations, including constrained environments such as for communication in Machine to Machine (M2M) and Internet of Things (IoT) contexts where a small code footprint is required and/or network bandwidth is at a premium.”
The key advantages of using MQTT instead of obtaining the metadata directly from the camera are:
► Clarity
No decoding of bits and bytes, data are in JSON (JavaScript Object Notation) format with human readable info.
► Lightweight
Less load on the camera. The camera only publishes its metadata to a MQTT broker, while clients consume the metadata from the MQTT broker, hence multiple clients can receive the same metadata data without having to increase any load in the camera.
► Filters
Clients can apply filters to the MQTT Topics to receive only metadata that are of interest, for example counter message only, hence reducing the client load and allows it to interface to a lot more cameras.
► Scalability
MQTT can support multiple subscribers (applications) and multiple publishers (cameras). This allows multiple clients of different applications to receive the metadata from the cameras without adding any additional load to the cameras. The architecture of MQTT allows redundancy as well as decentralization.
1.3 Bosch ONVIF Profile M
In the following chapters, we will provide you a step-by-step guide from setting up the camera’s MQTT client and explaining each MQTT Topics it can stream.
Before we dive into the setup, there is some terminology of MQTT that you need to be familiar with:
► An MQTT broker is a piece of software that acts as a server, or hub, that distributes MQTT messages to clients that subscribe to the messages and receive MQTT messages from the camera, e.g. Eclipse Mosquitto [4].
► An MQTT Topic, as the name implies, this is the name of the data that you want to receive, it comes in the format of “xxxx/yyyy/zzzz/…”, each of the section in the topic is used as a different subject related to the data, henceforth a client application can apply a filter to receive only data that it is interested in.
For more info on MQTT Topics filtering follow this link.
► MQTT subscriber is the client (application) that wants to receive the metadata from the MQTT Broker.
► MQTT publisher is a client in the camera that sends the metadata to the MQTT Broker.
In order to utilize MQTT, you need an MQTT broker in the network. It can be one in the same network as the cameras or one hosted in the cloud. Bosch cameras connect using MQTT 3.11.
Note: MQTT servers typically support multiple client versions but a client has to chose one on connect. Differences between the versions for publish are minimal.
Step-by-step guide
2. Configuration
2.1 MQTT Settings using Configuration Manager
You will need Configuration Manager 7.50 or newer installed [5].
The following steps are applicable if you add the camera to your system natively or as a ONVIF camera.
-
Step 1: Add the Bosch camera in Configuration Manager, or scan network, if not done yet.
-
Step 2: Go to Settings -> Network -> MQTT and you will see the following screen
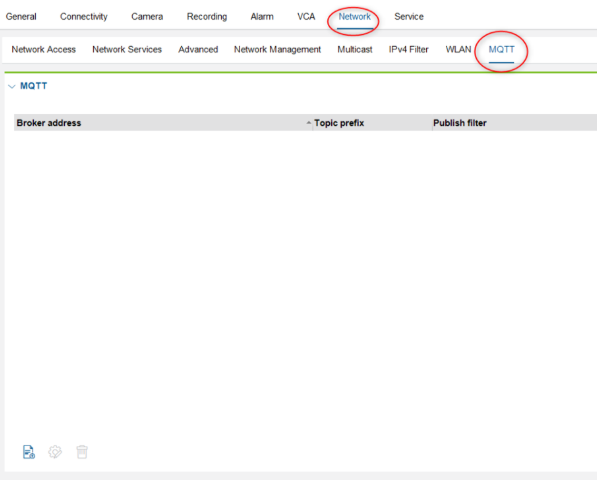
Figure 1: MQTT settings
2.2 Adding an MQTT Broker
Note: Each camera can support multiple MQTT brokers; in very rare occasions you might need such a setup. However, consider that each MQTT broker a camera connects to is an additional Metadata RTSP stream. The more streams a camera needs to handle, the higher the load to the camera is. A maximum of 4 entries is allowed.
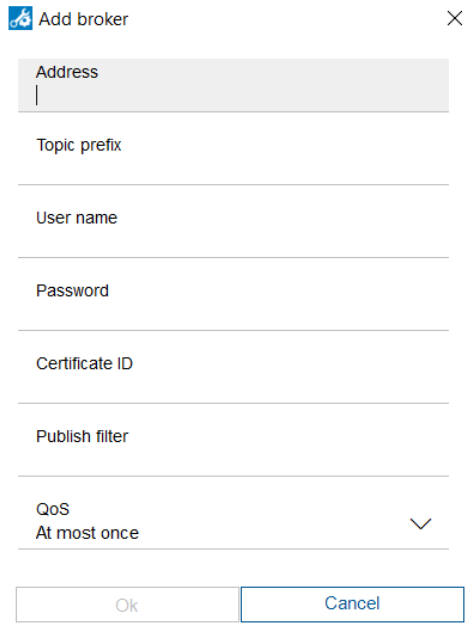
Figure 2: Add MQTT Broker menu
Address: The IP address of the MQTT broker + the Port number. Typically, an MQTT broker uses port 1883. Please refer to your MQTT broker setup for the exact port number. The protocol used to connect to the MQTT is needed as well, it is either mqtt:// or mqtts://.
Example: mqtt://192.168.2.1:1883.
Note: The implementation does not support URL addresses yet, such as cloud MQTT brokers; only IP address is supported.
Topic prefix: This is the unique identifier for the camera within the Topic. You need to ensure this prefix is unique else the clients will receive incorrect data or the MQTT broker will refuse connection. You could either use the name of the camera (with no spacing) or the IP address of the camera, as long as it is unique in the entire system.
User name: Username needed for connection to MQTT broker, refer to your MQTT Broker setup.
Password: Password needed in conjunction to the username
Certificate ID: Not used, leave blank
Publish filter: It is possible to limit the topics to be published to the MQTT broker, this can help to reduce the network traffic and bandwidth required. Below are two examples, illustrating how this filter works:
-
Example 1: Publish only Rule Engine messages
Publish filter: “tns1:RuleEngine//.” -
Example 2: Publish only Rule Engine counter message and I/O states
Publish filter: “tns1:RuleEngine/CountAggregation//.|tns1: Device//.”
QoS – MQTT supports 3 levels of QoS (Quality of Service); depending on your application requirement, you can configure the QoS of your MQTT message as:
a. At most once (level 0) – typically this is the most frequently used level
b. At least once (level 1)
c. Exactly once (level 2)
For details on each level, you may refer to this external blog post about MQTT essentials. [5]
3. Bosch Camera MQTT Topics
The following provides details about the MQTT Topics which Bosch cameras may publish. Some of these topics will only be published if the corresponding IVA rule has been configured in the camera.
All MQTT Topics start with the Prefix identifier + “/onvif-ej” you had to configure, for example if the Prefix identifier is configured as “BoschCam1”, then the Topic from this camera will looks like “BoschCam1/onvif-ej /xxxx/yyyy/xxxx/….”.
Use an MQTT client to subscribe to all topics to view what is published by the camera. MQTT Explorer [7] is one of those easy-to-use clients. To subscribe to all Topics of this camera, use “BoschCam1/#” as the Topic to subscribe to.
Below is a screen shot of an example of the type of MQTT data you could receive using the client MQTT Explorer
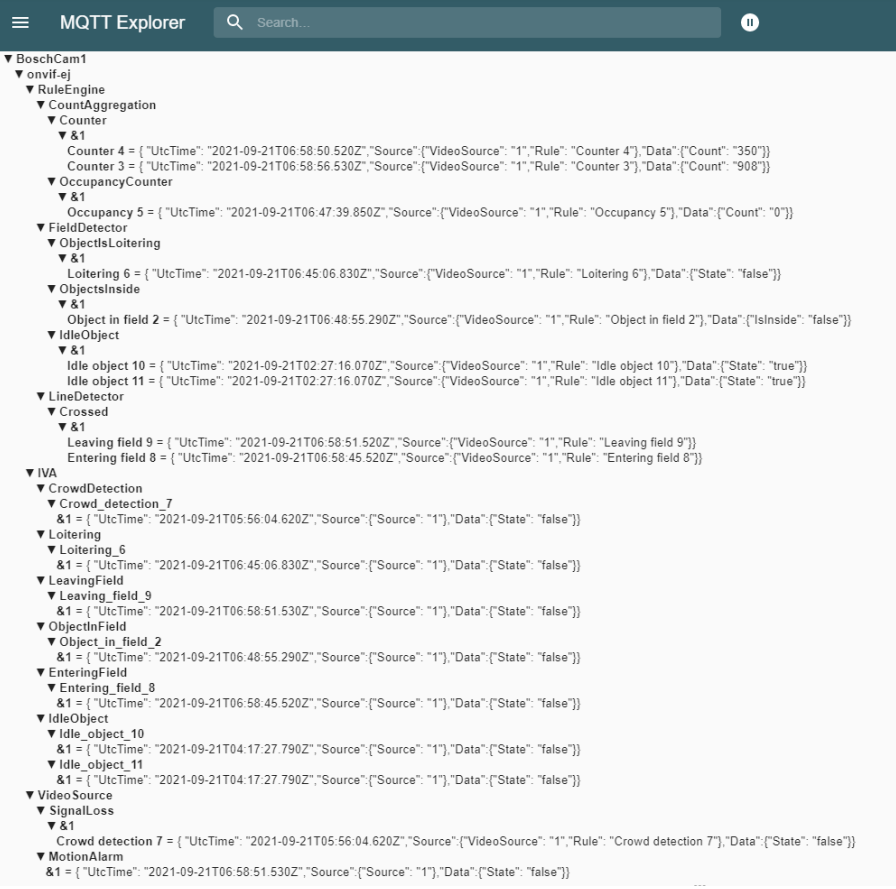
Figure 3: MQTT Explorer example
Note: Within the Topics format, you will usually see a “&1”, this represents the video source number. Typically, each camera only has a single video source, only certain cameras like MIC IP fusion 9000i and FLEXIDOME multi 7000i have multiple video sources, hence you will see “&2”, and possibly “&3” or “&4” for those cameras with multiple video sources.
3.1 Rule Engine
This Topic publishes the events being triggered by the camera’s IVA Rule Engine, it consists of:
-
CountAggregation
-
FieldDetector
-
LineDetector
-
ObjectDetection
-
ObjectTrack
-
Recognition
3.1.1 CountAggregation
This Topic provides the counter value from the camera. It supports IVA counters from line crossing or occupancy counter. This topic will only be generated when the counter number changes.
3.1.1.1 IVA Line crossing counters
The format of the topic is:
<Prefix identifier>/onvif-ej/RuleEngine/CountAggregation/Counter/&1/<IVA rule Name>
Example: “BoschCam1/onvif-ej/RuleEngine/CountAggregation/Counter/&1/Counter 4”
JSON data format:
{
“UtcTime” : yyyy-mm-ddThh:mm:ss.sssZ,
“Source” : { “VideoSource”: X,“Rule”:<IVA rule Name> },
“Data”: {“Count” : N}
}
yyyy-mm-ddThh:mm:ss.sssZ – the date and time of the event in GMT 0 time zone format.
X – the video source “1” to N, MIC IP fusion 9000i has 2 video sources (optical and thermal), the x indicates the metadata belonging to which video source.
<IVA rule Name> – The name configured in the camera for this particular IVA rule.
N – the current count number from this IVA counter.
3.1.1.2 IVA occupancy counters
The format of the topic is:
<Prefix identifier>/onvif-ej/RuleEngine/CountAggregation/OccupancyCounter/&1/<IVA rule Name>
Example: “BoschCam1/onvif-ej/RuleEngine/CountAggregation/OccupancyCounter /&1/Waiting Area Counter 4”
JSON data format:
{
“UtcTime” : yyyy-mm-ddThh:mm:ss.sssZ,
“Source” : { “VideoSource”: X, “Rule”: <IVA rule name>},
“Data”: {“Count” : N}
}
yyyy-mm-ddThh:mm:ss.sssZ – the date and time of the event in GMT 0 timezone format
X – the video source “1” to N, MIC IP fusion 9000i has 2 video sources (optical and thermal), the x indicates the metadata belonging to which video source.
<IVA rule name> – The name configured in the camera for this particular IVA rule.
N – the current count number from this IVA occupancy counter
3.1.2 FieldDetector
This Topic provides the event status from the camera when one of the IVA fields has been triggered.
It supports IVA rules:
-
Loitering
-
Object in Field
-
Idle Object
-
Removed Object
3.1.2.1 Loitering
This event will be published when the IVA rule with Loitering has been triggered.
The format of the topic is:
<Prefix identifier>/onvif-ej/RuleEngine/FieldDetector/ObjectIsLoitering/&1/<IVA rule Name>
Example: “BoschCam1/onvif-ej/RuleEngine/FieldDetector/ObjectIsLoitering/&1/Loitering 6”
JSON data format:
{
“UtcTime” : yyyy-mm-ddThh:mm:ss.sssZ,
“Source” : { “VideoSource”: X, “Rule”:<IVA rule Name>},
“Data”: {“Status” : B}
}
yyyy-mm-ddThh:mm:ss.sssZ – the date and time of the event in GMT 0 timezone format
X – the video source “1” to N, MIC IP fusion 9000i has 2 video sources (optical and thermal), the x indicates the metadata belonging to which video source.
<IVA rule Name> – The name configured in the camera for this particular IVA rule.
B – the status of the event, either TRUE or FALSE. This event will be published whenever the status changes.
3.1.2.2 Object in Field
This event will be published when the IVA rule with Object in field has been triggered.
The format of the topic is:
<Prefix identifier>/onvif-ej/RuleEngine/FieldDetector/ObjectsInside/&1/<IVA rule Name>
Example: “BoschCam1/onvif-ej/RuleEngine/FieldDetector/ObjectsInside /&1/Object in field 2”
JSON data format:
{
“UtcTime” : yyyy-mm-ddThh:mm:ss.sssZ,
“Source” : { “VideoSource”: X, “Rule”:<IVA rule Name> },
“Data”: {“IsInside” : S}
}
yyyy-mm-ddThh:mm:ss.sssZ – the date and time of the event in GMT 0 timezone format
X – the video source “1” to N, MIC IP fusion 9000i has 2 video sources (optical and thermal), the x indicates the metadata belonging to which video source.
<IVA rule Name> - The name configured in the camera for this particular IVA rule.
S – When an object has been detected inside a field, the IsInside status will change to TRUE. Likewise, when there is no object in the field, the Isinside status will change to FALSE. This event will be published whenever the Isinside status changes.
3.1.2.3 Idle object
This event will be published when the IVA rule with Idle object has been triggered.
The format of the topic is:
<Prefix identifier>/onvif-ej/RuleEngine/FieldDetector /IdleObject /&1/<IVA rule Name>
Example: “BoschCam1/onvif-ej/RuleEngine/FieldDetector /IdleObject /&1/Idle Object”
JSON data format:
{
“UtcTime” : yyyy-mm-ddThh:mm:ss.sssZ,
“Source” : { “VideoSource”: X, “Rule”:<IVA rule Name> },
}
yyyy-mm-ddThh:mm:ss.sssZ – the date and time of the event in GMT 0 timezone format
X – the video source “1” to N, MIC fusion 9000 has 2 video sources (optical and Thermal), the x indicates the metadata belongs to which video source.
<IVA rule Name>- The name configured in the camera for this particular IVA rule
3.1.2.4 Removed object
This event will be published when the IVA rule with Removed object has been triggered.
The format of the topic is:
<Prefix identifier>/onvif-ej/RuleEngine/FieldDetector/RemovedObject /&1/<IVA rule Name>
Example: “BoschCam1/onvif-ej/RuleEngine/FieldDetector/RemovedObject /&1/Idle Object”
JSON data format:
{
“UtcTime” : yyyy-mm-ddThh:mm:ss.sssZ,
“Source” : { “VideoSource”: X, “Rule”:<IVA rule Name> },
}
yyyy-mm-ddThh:mm:ss.sssZ – the date and time of the event in GMT 0 timezone format
X – the video source “1” to N, MIC IP fusion 9000i has 2 video sources (optical and thermal), the x indicates the metadata belonging to which video source.
<IVA rule Name>- The name configured in the camera for this particular IVA rule
3.1.3 LineDetector
This Topic will be published when an object crosses an IVA line, or enters or exits an IVA field.
The format of the topic is:
<Prefix identifier>/onvif-ej/RuleEngine/LineDetector /Crossed/&1/<IVA rule Name>
Example: “BoschCam1/onvif-ej/RuleEngine/LineDetector/Crossed/&1/Enter office”
JSON data format:
{
“UtcTime” : yyyy-mm-ddThh:mm:ss.sssZ,
“Source” : { “VideoSource”: X, “Rule”: <IVA rule name> },
“Data” : {“Object”: O}
}
yyyy-mm-ddThh:mm:ss.sssZ – the date and time of the event in GMT 0 timezone format
X – the video source “1” to N, MIC IP fusion 9000i has 2 video sources (optical and thermal), the x indicates the metadata belonging to which video source.
<IVA rule name> - The name configured in the camera for this particular IVA rule.
O – the properties of the object that triggered this event. See chapter 4 for more details.
3.1.4 ObjectDetection
This event will be published when an IVA event that is configured with Appearance Search or PPE Monitoring has been triggered.
The format of the topic is:
<Prefix identifier>/onvif-ej/RuleEngine/ObjectDetection/Object/&1/<IVA_rule_Name>
Example: “BoschCam1//RuleEngine/ObjectDetection/Object/&1/Appearance Search 1/”
JSON data format:
{
“UtcTime” : yyyy-mm-ddThh:mm:ss.sssZ,
“Source” : { “VideoSource”: X, “Rule”: <IVA rule name> },
“Data”: {“Object”:O}
}
yyyy-mm-ddThh:mm:ss.sssZ – the date and time of the event in GMT 0 timezone format
X – the video source “1” to N, MIC IP fusion 9000i has 2 video sources (optical and thermal), the x indicates the metadata belonging to which video source.
<IVA rule name> - The name configured in the camera for this particular IVA rule
O – the properties of the object that triggered this event. See chapter 4 for more details.
3.1.5 ObjectTrack
This event will be published when an IVA event that is configured with Leaving Field rule has been triggered.
The format of the topic is:
<Prefix identifier>/onvif-ej/RuleEngine/ObjectTrack/Aggregation/&1/<IVA_rule_Name>
Example: “BoschCam1//RuleEngine/ObjectTrack/Aggregation/&1/Leaving Field 3/”
JSON data format:
{
“UtcTime” : yyyy-mm-ddThh:mm:ss.sssZ,
“Source” : { “VideoSource”: X, “Rule”: <IVA rule name> },
“Data”: { “AggregationStart”: A, “Object”:O}
}
yyyy-mm-ddThh:mm:ss.sssZ – the date and time of the event in GMT 0 timezone format
X – the video source “1” to N, MIC IP fusion 9000i has 2 video sources (optical and thermal), the x indicates the metadata belonging to which video source.
<IVA rule name> - The name configured in the camera for this particular IVA rule
A – the time when the aggregation of the object properties started.
O – the properties of the object that triggered this event, aggregated over the time between the time of the aggregation start A and the time of the event itself. See chapter 4 for more details.
3.1.6 Recognition
This event will be published when an LPR event has been triggered.
The format of the topic is:
<Prefix identifier>/onvif-ej/RuleEngine/Recognition/LicensePlate/&1/<IVA_rule_Name>
Example: “BoschCam1//RuleEngine/Recognition/LicensePlate/&1/LPR-Detector 1/”
JSON data format:
{
“UtcTime” : yyyy-mm-ddThh:mm:ss.sssZ,
“Source” : { “VideoSource”: X, “Rule”: <IVA rule name> },
“Data”: { “Object”:O}
}
yyyy-mm-ddThh:mm:ss.sssZ – the date and time of the event in GMT 0 timezone format
X – the video source “1” to N, MIC IP fusion 9000i has 2 video sources (optical and thermal), the x indicates the metadata belonging to which video source.
<IVA rule name> - The name configured in the camera for this particular IVA rule
O – the properties of the object that triggered this event. See chapter 4 for more details.
3.2 VideoSource
This Topic publishes the general events been triggered by the camera. It consists of the following:
It consists of the following:
-
MotionAlarm
-
SignalLoss
-
GlobalSceneChange
-
ImageTooBright
-
ImageTooDark
3.2.1 MotionAlarm
This Topic will be published whenever there’s any motion or IVA alarm has been triggered. It is useful when application requires only a general trigger when there is an alarm.
The format of the topic is:
<Prefix identifier>/onvif-ej/VideoSource/MotionAlarm/&1
Example: “BoschCam1/onvif-ej/VideoSource/MotionAlarm/&1”
JSON data format:
{
“UtcTime” : yyyy-mm-ddThh:mm:ss.sssZ,
“Source” : { “Source”: X},
“Data”: { “State”: B}
}
yyyy-mm-ddThh:mm:ss.sssZ – the date and time of the event in GMT 0 timezone format
X – the video source “1” to N, MIC IP fusion 9000i has 2 video sources (optical and thermal), the x indicates the metadata belonging to which video source.
B - When there is any alarm event from IVA or MOTION+, State will change to TRUE, immediately followed by another message being published with State changing to FALSE. This event is a pulse type of event.
3.2.2 SignalLoss
Note: This is theoretical as a camera would typically not report signal loss due to its direct connection to the sensor. Consider this for reference purposes only.
This Topic will be published whenever Signal Loss detection events have been triggered.
The format of the topic is:
<Prefix identifier>/onvif-ej/VideoSource/SignalLoss /&1/<IVA rule name>
Example: “BoschCam1/onvif-ej/VideoSource/SignalLoss/&1/Shopping mall main lobby”
JSON data format:
{
“UtcTime” : yyyy-mm-ddThh:mm:ss.sssZ,
“Source” : { “VideoSource”: X, “Rule”: <IVA rule name>},
“Data”: { “State”: B}
}
yyyy-mm-ddThh:mm:ss.sssZ – the date and time of the event in GMT 0 timezone format
X – the video source “1” to N, MIC IP fusion 9000i has 2 video sources (optical and thermal), the x indicates the metadata belonging to which video source.
<IVA rule name>- The name configured in the camera for this particular IVA rule.
B - When there is any alarm event from IVA or MOTION+, State will change to TRUE, immediately followed by another message being published with State changed to FALSE. This event is a pulse type of event.
3.2.3 GlobalSceneChange
This Topic will be published whenever the reference image differs from the current camera view. This happens when the camera is shifted out of it original position, or the view of the camera has been obstructed.
The format of the topic is:
<Prefix identifier>/onvif-ej/VideoSource/GlobalSceneChange/AnalyticsService/&1
Example: “BoschCam1/onvif-ej/VideoSource/GlobalSceneChange/AnalyticsService/&1”
JSON data format:
{
“UtcTime” : yyyy-mm-ddThh:mm:ss.sssZ, “
Source” : { “Source”: X},
“Data”: { “State”: B}
}
yyyy-mm-ddThh:mm:ss.sssZ – the date and time of the event in GMT 0 timezone format
X – the video source “1” to N, MIC IP fusion 9000i has 2 video sources (optical and thermal), the x indicates the metadata belonging to which video source.
B - When the camera reference image does not match the current view, State will change to TRUE. When the view is restored back then a new message will be published with State changed to FALSE. For example, a cloth covering the camera’s lens will trigger TRUE, and removing the cloth will trigger FALSE.
3.2.4 ImageTooDark
This Topic will be published whenever the camera is not receiving enough light to generate an image.
The format of the topic is:
<Prefix identifier>/onvif-ej/VideoSource/ImageTooDark/AnalyticsService/&1
Example: “BoschCam1/onvif-ej/VideoSource/ImageTooDark/AnalyticsService/&1”
JSON data format:
{
“UtcTime” : yyyy-mm-ddThh:mm:ss.sssZ,
“Source” : { “Source”: X},
“Data”: { “State”: B}
}
yyyy-mm-ddThh:mm:ss.sssZ – the date and time of the event in GMT 0 timezone format
X – the video source “1” to N, MIC IP fusion 9000i has 2 video sources (optical and thermal), the x indicates the metadata belonging to which video source.
B - When the camera is not receiving sufficient light to the sensor to generate an image, State will change to TRUE. If there is sufficient light, State will change to FALSE.
3.2.5 ImageTooBright
This Topic will be published whenever the camera is receiving too much light. For example, a very strong light source shines directly into the camera.
The format of the topic is:
<Prefix identifier>/onvif-ej/VideoSource/ImageTooBright/AnalyticsService/&1
Example: “BoschCam1/onvif-ej/VideoSource/ImageTooBright/AnalyticsService/&1”
JSON data format:
{
“UtcTime” : yyyy-mm-ddThh:mm:ss.sssZ,
“Source” : { “Source”: X},
“Data”: { “State”: B}
}
yyyy-mm-ddThh:mm:ss.sssZ – the date and time of the event in GMT 0 timezone format
X – the video source “1” to N, MIC IP fusion 9000i has 2 video sources (optical and thermal), the x indicates the metadata belonging to which video source.
B - When the camera is receiving too much light to the sensor, State will change to TRUE. If there is sufficient light, State will change to FALSE.
3.3 Device
This Topic publishes the events of Inputs and outputs of the camera. It consists of the following:
-
Trigger – Relay
-
Trigger - DigitalInput
3.3.1 Trigger - Relay
This Topic will be published when the status of the output changes.
The format of the topic is :
<Prefix identifier>/onvif-ej/Device/Relay/&<RELAY_name>
Example: “BoschCam1/onvif-ej/Device/Relay /&Output_1”
JSON data format :
{
“UtcTime” : yyyy-mm-ddThh:mm:ss.sssZ,
“Source” : { “RelayToken”: X},
“Data”: { “LogicalState”: S}
}
yyyy-mm-ddThh:mm:ss.sssZ – the date and time of the event in GMT 0 timezone format
X – the output name as configured in the camera.
S – When the output is at ON state, the LogicalState will change to “active”. When it is in OFF state, the LogicalState will change to “inactive”.
3.3.2 Trigger - DigitalInput
This Topic will be published when the status of the input changes.
The format of the topic is:
<Prefix identifier>/onvif-ej/Device/DigitalInput/&<INPUT_name>
Example: “BoschCam1/onvif-ej/Device/DigitalInput /&Input_1”
JSON data format:
{
“UtcTime” : yyyy-mm-ddThh:mm:ss.sssZ,
“Source” : { “InputToken”: X},
“Data”: { “LogicalState”: B}
}
yyyy-mm-ddThh:mm:ss.sssZ – the date and time of the event in GMT 0 timezone format
X – the input name as configured in the camera.
B – When the input is at ON state, LogicalState will change to TRUE. When it is in OFF state, LogicalState will change to FALSE.
3.4 Recording
This Topic publishes the status of the recording events of the camera.
The format of the topic is:
<Prefix identifier>/onvif-ej/RecordingConfig/JobState/&<Recording name>
Example: “BoschCam1/onvif-ej/RecordingConfig/JobState/&RecJob_Cam1Rec0”
JSON data format:
{
“UtcTime” : yyyy-mm-ddThh:mm:ss.sssZ,
“Source” : { “RecordingJobToken”:<Recording name>},
“Data”: { “State”: S}
}
yyyy-mm-ddThh:mm:ss.sssZ – the date and time of the event in GMT 0 timezone format
<Recording name>– The is a predetermined format based on the camera Recording Profile. If you require to receive the message from recording 2, then the shall be “&RecJob_Cam1Rec1”.
S – When the recording started, State will be “active”.
Note: No message will be generated when the recording stops, nor any error messages reported.
4. IVA Object Properties in MQTT
With FW 9.80, properties of object triggering selected MQTT events were added. This section describes which events are supported and which object properties are sent out.
4.1 IVA Pro Buildings, IVA Pro Visual Gun Detection
The IVA tasks that will add object properties to the MQTT event output are:
-
Line crossing
-
Leaving field
The following object properties are supported:
-
ID
-
Class
-
Snapshots (format: Base64)
Example:
{ "UtcTime": "2025-08-20T12:10:03.880Z","Source":{"VideoSource": "1","Rule": "Crossing line 1"},"Data":{"Object": {"Object": {"@ObjectId":637,"Appearance": {"Class": {"Type": {"@Likelihood":0.96,"#text":"Person"}}}}}}}
4.2 IVA Pro Perimeter, IVA Pro Traffic
The IVA tasks that will add object properties to the MQTT event output are:
-
Line crossing
-
Leaving field
-
ID
-
Class
-
Speed (with 3D tracking modes)
-
Geolocation with 3D tracking modes)
-
Snapshots (format: Base64)
Example:
{ "UtcTime": "2025-08-20T12:16:42.920Z","Source":{"VideoSource": "1","Rule": "Crossing line 1"},"Data":{"Object": {"Object": {"@ObjectId":726,"Appearance": {"Class": {"Type": {"@Likelihood":0.85,"#text":"Person"}},"GeoLocation": {"@elevation":"0.00","@lat":"52.15002872","@lon":"9.95007924",}},"Behaviour": {"Speed": 0.06}}}}}
4.3 IVA Pro PPE
The IVA tasks that will add object properties to the MQTT event output are:
-
Line crossing
-
Leaving field
-
PPE monitoring
The following object properties are supported:
-
ID
-
Class
-
Snapshots (format: Base64)
-
Safety vest
-
Hard hat
Example:
{ "UtcTime": "2025-09-01T11:30:31.109Z","Source":{"VideoSource": "1","Rule": "Crossing line 2"},"Data":{"Object": {"Object": {"@ObjectId":37,"Appearance": {"Class": {"Type": {"@Likelihood":0.95,"#text":"Person"}},"HumanFace": {"Accessory": {"Helmet": {"Wear": "true","Subtype": ConstructionCap"}}},"HumanBody": {"Clothing": {"Tops": {"Style": "Vest"}}}}}}}}
4.4 IVA Pro Appearance
The IVA tasks that will add object properties to the MQTT event output are:
-
Line crossing
-
Leaving field
-
Appearance search
The following object properties are supported:
-
ID
-
Class
-
Snapshots (format: Base64)
-
Gender
-
Hair length
-
Hair color
-
Top clothes length
-
Top clothes color
-
Bottom clothes length
-
Bottom clothes color
-
Glasses
-
Bag
-
Backpack
Example:
{ "UtcTime": "2025-09-01T11:39:20.897Z","Source":{"VideoSource": "1","Rule": "Crossing line 2"},"Data":{"Object": {"Object": {"@ObjectId":68,"Appearance": {"Class": {"Type": {"@Likelihood":1.00,"#text":"Person"}},"HumanFace": {"Gender": "Male","Hair": {"Length": "Short","Color": {"ColorCluster": {"Color": {"@Z":"80.00","@Y":"139.00","@X":"184.00",}}}},"Accessory": {"Opticals": {"Wear": "false"}}},"HumanBody": {"Clothing": {"Tops": {"Category": "ShortSleeve","Color": {"ColorCluster": {"Color": {"@Z":"255.00","@Y":"255.00","@X":"255.00",}}}},"Bottoms": {"Category": "Trousers","Color": {"ColorCluster": {"Color": {"@Z":"255.00","@Y":"0.00","@X":"0.00",}}}}},"Belonging": {"Bag": {"Category": "Backpack"}}}}}}}}
4.5 IVA Pro License Plate Recognition
With IVA Pro License Plate Recognition, each detected license plate will generate an MQTT event.
The following license plate properties are supported:
-
Plate number
-
Plate type
-
Country code
-
Issuing Entity (State)
-
Vehicle Make and model (MMR license needed)
-
Matched to in-camera list (label)
-
License plate snapshot (format: Base64)
Example:
{UtcTime": "2025-09-25T06:45:56.454Z", "Source": { "VideoSource": "1", "Rule": "LPR-Detector" }, "Data": { "Likelihood":
"0.92", "LicensePlateInfo": { "LicensePlateInfo": { "PlateNumber": { "@Likelihood": 0.92, "#text": "SN66 XMZ" }, "PlateType":
{ "@Likelihood": 0.92, "#text": "Normal" }, "CountryCode": { "@Likelihood": 0.99, "#text": "GB" }, "IssuingEntity":
{ "@Likelihood": 0.92, "#text": "EDH" } } }, "VehicleInfo": { "VehicleInfo": { "Type": { "@Likelihood": 1, "#text": "Car" },
"Brand": { "@Likelihood": 1, "#text": "mercedes-benz" }, "Model": { "@Likelihood": 1, "#text": "gla" } } } } }
4.6 Notes and limitations
For line crossing, appearance search and PPE monitoring, the attributes are outputted as they are at the time of the event
For leaving field, attributes are aggregated over the time the object spend in the field. Thus
o No geolocation available
o Speed is averaged
o Snapshot with largest byte size is selected
Appearance and PPE attributes are generated every 3 seconds. Objects just entering the scene will therefore not have these right away. Therefore take care with the placement of your line crossing and allow enough observation time of the objects before the line crossing
4.7 Why not support other tasks as well?
Object in field generates an event when the first object enters the field. Any subsequent objects entering while there is still an object in the field will not generate additional events, and thus their attributes cannot be transmitted. Thus, sending object properties for object in field is not supported.
Counter and Occupancy generate events when a certain count is reached. At that point in time, the information about which objects participated to the count is no longer available, and thus their attributes cannot be transmitted. Therefore these tasks are not supported either.
References
-
ONVIF Profile M specification https://www.onvif.org/profiles/profile-m/
-
Bosch IP camera firmware via DownloadStore https://downloadstore.keenfinity-group.com/index.php?type=FW
-
MQTT specification https://mqtt.org/mqtt-specification/
-
Eclipse Mosquitto https://mosquitto.org/
-
Configuration Manager via DownloadStore https://downloadstore.keenfinity-group.com/index.php?type=CM
-
External blog post about MQTT essentials https://www.hivemq.com/blog/
-
MQTT Explorer http://mqtt-explorer.com/