
Question
How can you configure and use KBD-UXF to control the Milestone Smart Client?
Answer
In the plugin folder KBD-Universal XF plug-in, you will also find the manual with the information as described in this article.
This article describes the installation, configuration and use of the Bosch CRS Keyboard Plugin in the Milestone Smart Client.
1. Installation of the Bosch Keyboard Plugin
The setup installer will guide you through the installation of the plugin. There are two different procedures in order to install the Plugin:
-
Server side installation
-
Client side installation
1.1. Server side installation
The Server side installer will assign the Smart Client plugin to the download manager, which will then be available from the Client PC by accessing the following URL:
http://your-milestone-management-server/installation
Just follow the instructions on the setup wizard in order to have the plugin registered to the Milestone Download manager System.
1.2. Client side installation
The Client side installation wizard will guide you through the installation of the Plugin. It will copy all necessary Files and register your Plugin for the use. Furthermore it will install the related driver for your Bosch Keyboard. Just follow the instructions of the wizard in order to have everything done.
2. Configuration of the KBD Plugin
The Milestone Keyboard plugin is almost ready for use. There are just some additional options you can configure for your individual needs and use. Use the upper right corner in the Smart Client in order to open the options dialog and select the Bosch KBD Options entry:
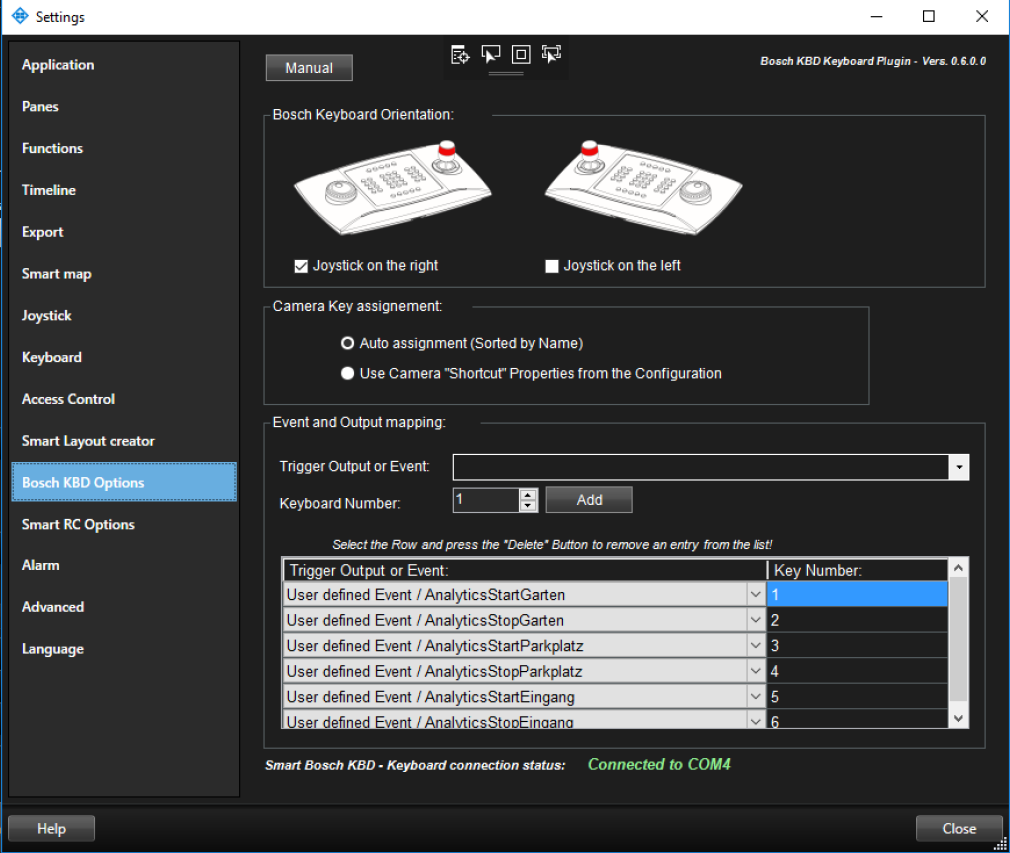
2.1. Left or right hand joystick
You can change the Keyboard to left hand joystick mode if needed, by checking the desired as seen in the screenshot.
2.2. Camera Key assignment
Choose which Camera Key assignment you want to use for the Insert Camera in ViewItem Mode:
-
Auto assignment / this mode is getting the camera list sorted by Name from the system configuration. The Key assignment is automatically done.
Please note, that this is directly dependent on your camera naming and can be look like this, in order to have some control over the sorting:
e.g.:
[001 Camera 1]
[002 Camera 2]
[ …. ]
[999 Camera 99]
-
Use Camera “Shortcut” Properties from the Configuration / this mode is getting the configured Shortcuts for your camera:

Note
You must assign a shortcut to all cameras you want to have in the list. Otherwise, they will not be available. Please be careful, as the system is taking the same shortcut twice. In this case it will take the first camera in the ordered list.
2.3. Event and Output mapping
You can also map some User defined events or Hardware outputs to any numeric number in order to trigger them directly from the Keyboard as shown in the bottom section of the screenshot.
3. Using the Bosch Keyboard to control the Milestone Smart Client
3.1 General function of the Keyboard
After the start of the SmartClient the Keyboard will be initialized regarding your settings (left- or right hand), the attached amount of monitors and the operation mode (live or playback) for each monitor.
If a buttons light is on, it means that the function is available. Blinking indicates either its activity or waiting for addition input (most likely a number).
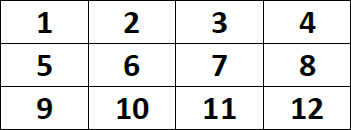
If there is no mode selected (no blinking buttons, except the selected monitor) you can select the view item (camera) of the selected View by entering the number followed by OK.
The numbering of the view items is usually starting with number 1 on the top left corner and ends with the highest number at the bottom right, row by row:
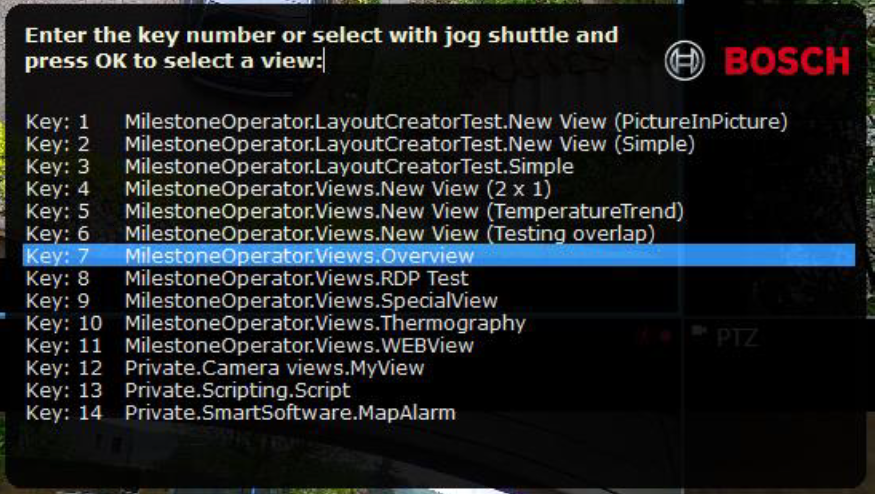
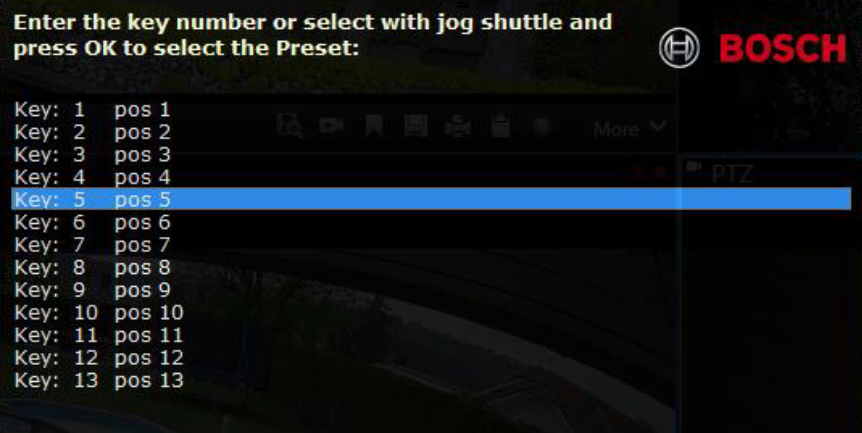
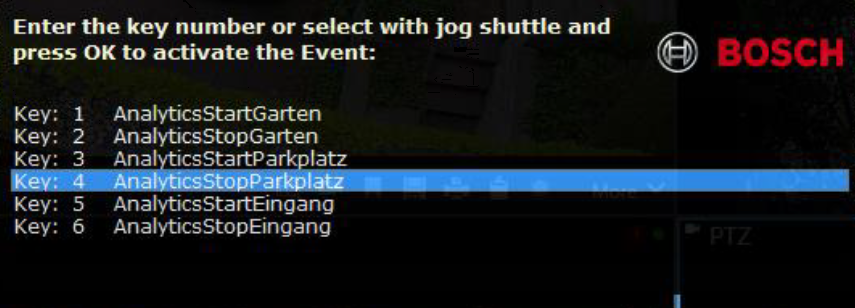
In case you need some assistance for unknown item values, the Plugin holds a Help and Selection window showing you the assignments of the Items to Keys. In order to show the Help window, you can simply touch the related button for more than 2 Seconds and the window shows up. You can use the Jog Shuttle wheel and press OK to select an entry and to close the window. The window can be closed by pressing ESC or by pressing the related button again.
Actually there is a Help window for:
3.7 View selection
3.8 Set Camera in View Item
3.15 Preset selection
3.21 Event or output selection
|
Icon |
Function |
Remarks |
|---|---|---|

|
3.2 Direct Monitor selection
Fast selection of monitor one to four
|
It might make sense to dynamically activate the monitor selection Button, if there are more than 4 Screens attached to this Client PC. |

|
3.3 Audio / Button Illumination
The Button is used to turn the Button illumination on or off.
|
In the Milestone Smart Client, the Audio Source is following the Camera selection and its related Microphone. |

|
3.4 Recording
Instant start and stop recording of all the cameras shown on the selected monitor.
|
|

|
3.5 Independent Playback – NOT USED
The independent Playback Button has no function. It is not possible to control the playback of a single camera. Use the Playback mode for the full monitor instead. |
|

|
3.6 Playback mode
Change the selected monitor to playback mode. The playback functions will be activated when a monitor is in playback mode.
|
|

|
3.7 View selection
Activate the “change view” mode. The button is blinking when the “change view” mode is activated and the input of a number is required.
|
|

|
3.8 Set Camera in View Item
Activate the “Set camera in view item” mode.

|
|

|
3.9 Restore Cameras in View
Restores all Camera view items back to its default. The Button is blinking when a camera in the View was replaced. |
|

|
3.10 Full Screen of the selected View item
Sets the selected view item into the full screen mode. The “Restore” button is blinking when the “item full screen” mode is activated. |
|

|
3.11 Restore the selected View item
Restores the selected View item from full screen. |
|

|
3.12 Escape input
Breaks the entering of a number. |
|

|
3.13 Confirm
Confirm a number entry. |
|

|
3.14 PTZ Mode on / off
Activates or deactivates the PTZ Function and enables the Joystick.
|
|

|
3.15 Preset selection
Select a PTZ position. Enter a valid number of a preset and confirm with OK.
|
|

|
3.16 Focus far
Press and hold the Button. Release to stop. |
|

|
3.17 Focus near
Press and hold the Button. Release to stop. |
|

|
3.18 Iris closed
|
|

|
3.19 Iris open
|
|

|
3.20 Monitor selection – NOT USED
Use the buttons 1 to 4 to direct select the monitor |
It might be possible to activate this button dynamically if more than 4 monitors are connected. |

|
3.21 Event or output selection
Enter a valid number of an assigned User Event or Output from the options and press OK.
|
Must be configured in the options dialog. |

|
3.22 Skip previous
Skip to the previous recorded sequence of the selected camera on the selected monitor. |
|

|
3.23 Play reverse
Reverse Playback of the selected monitor. |
|

|
3.24 Pause playback
Pause the playback of the selected monitor. |
|

|
3.25 Play forward
Normal forward playback of the selected monitor. |
|

|
3.26 Skip next
Skip to the next recorded sequence of the selected camera on the selected monitor. |
|