
Important!
Please note that the LPR functionality is now fully integrated into BVMS v13.1 and offers extended features and improvements.
We therefore recommend using BVMS v13.1 for all LPR-related configurations and operations.
The LPR EventManager tool was intended as a temporary solution before integration into BVMS v13.1.
See:
📚Overview:
1. Introduction
Problem Statement:

'Bridging the gap':

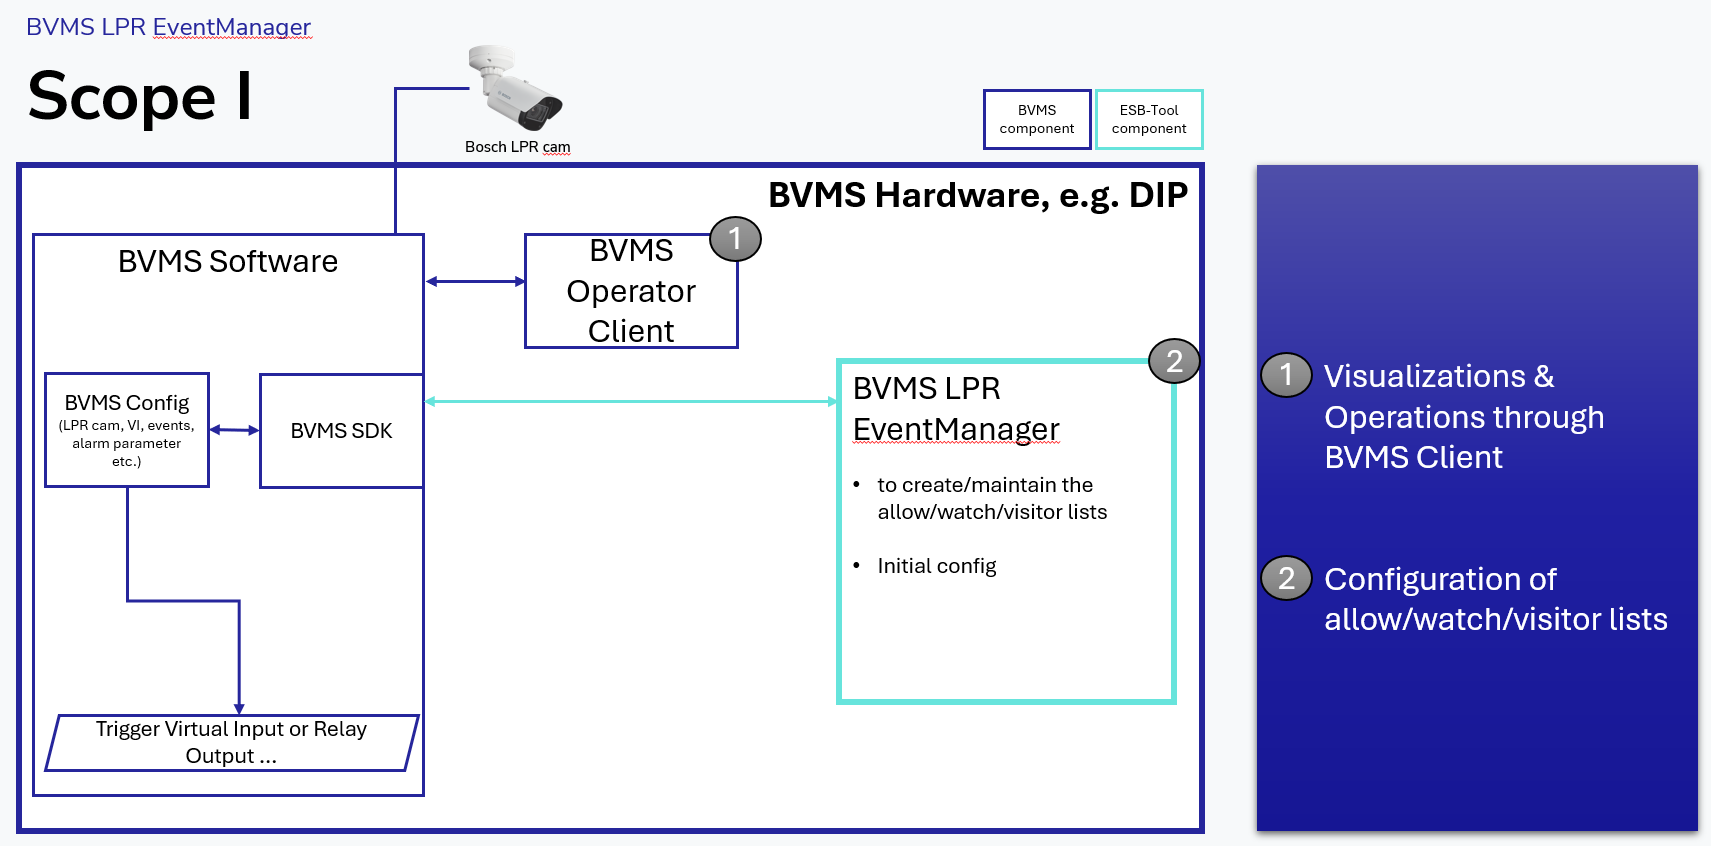
BVMS v12.3 and higher offer the new LPR (license plate recognition) feature. A prerequisite for it is a corresponding license for the camera, which enables the feature on this device. With an enabled LPR option the camera is able to recognize license plates and to trigger events. E.g. if the camera recognizes a license plate, an event/alarm is then triggered in BVMS. However, there is currently no way to filter the license plates according to a previously created list. This article describes how it can be realized.
The BVMS LPR EventManager offers the possibility to filter license plates based on a previously created list and then e.g. to trigger a 'Relay' or 'Virtual Input send data' based on this list. One or a maximum of three lists can be managed in your own database.
Following lists are supported: Allow list, Watch list and Visitor list
As database is used Microsoft SQL Server, which supports in total 10.000 license plate entries with a max. of three filter lists.
1.1. Scope / None-Scope
High-Level scope:
-
Max. LPRs are 10.000 via the LPR Config Tool in the ‘allow/watch/visitor’ list
-
The ‘allow/watch/visitor’ list can be maintained manually or im-,export via csv-file
-
There is only one ‘allow/watch/visitor’ list possible yet => in case the BVMS system would have multiple LPR cams the list would apply to all
-
Tool is writing in a separate ‘instance’ of existing BVMS SQL
-
No user management / audit function inside the tool yet
1.2. Requirements
-
A min. version of BVMS v12.3 or higher
-
⚠️ Important: Software must run on a machine with the BVMS Management Server installed
1.3. Preparation
Copy all files to an appropriate directory (e.g. 'C:\Program Files\Bosch\LPREventManager').
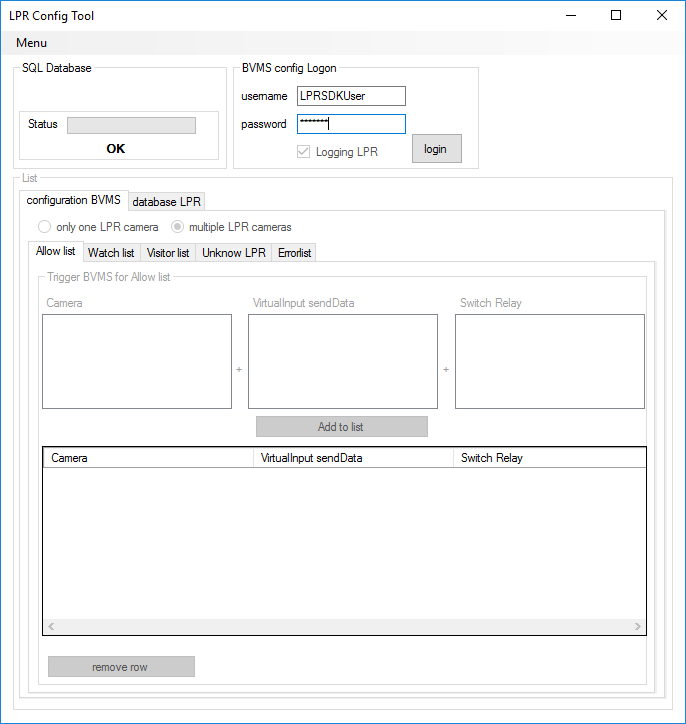
2. GUI
|
Item no. |
Description |
|---|---|
|
1 |
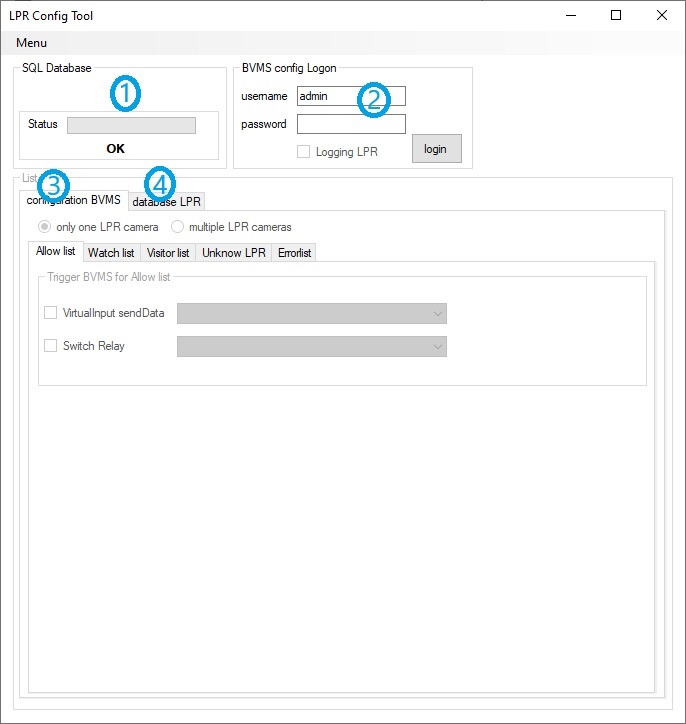
Displays the database status |
|
2 |
Local BVMS connection with authentication. Login with BVMS username and password with permissions for BVMS Events and device 'VirtualInputaSendData' and 'Relay'. ⚠Additionally it is possible to write LPR information to log files.
|
|
3 |
To trigger on BVMS side 'VirtualInput SendData' and/or 'Switch Relay'. The assign list can be found in the other tabs. E.g. if a license plate is added to the table and a 'Relay Switch' is configured under the tab 'Allow list', then this relay will be switched for one seconds if the particular license plate is detected. |
|
4 |
Table shows the added license plates and which are stored in the database. Consider using the tabs to assign a certain license plate to the appropriate list ('Allow list','Watch list','Visitor list'). |
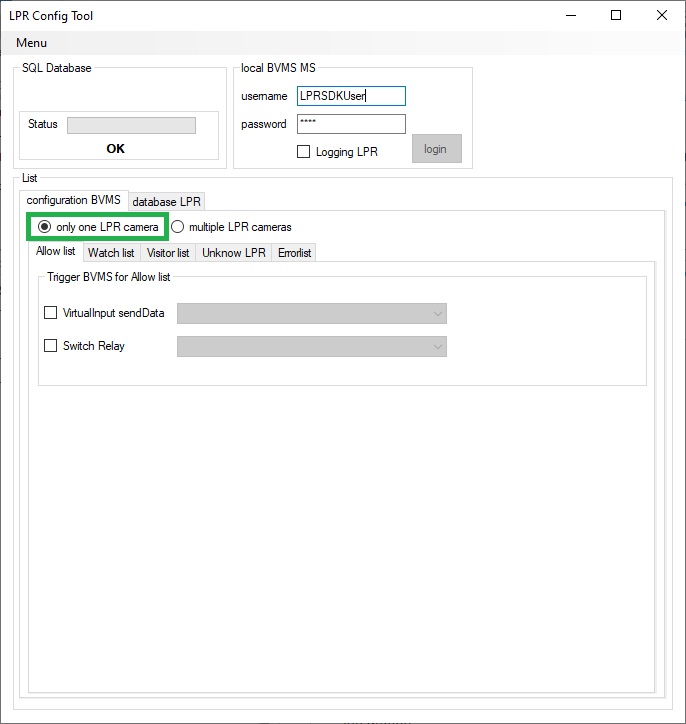
2.1. GUI - Mode only one trigger for all LPR cameras (recommended for an LPR camera!)
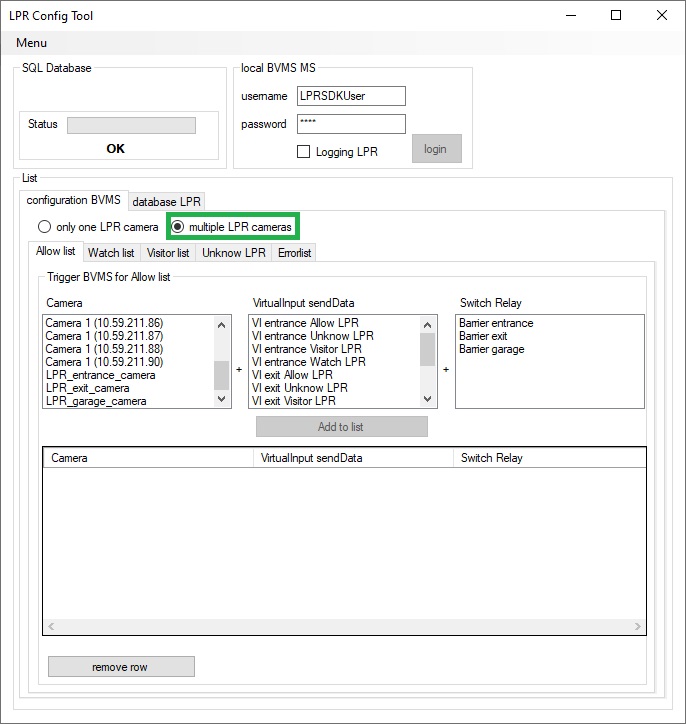
2.2. GUI - Mode different triggers for multiple LPR cameras

Step-by-step guide
3. Configuration
3.1. General steps
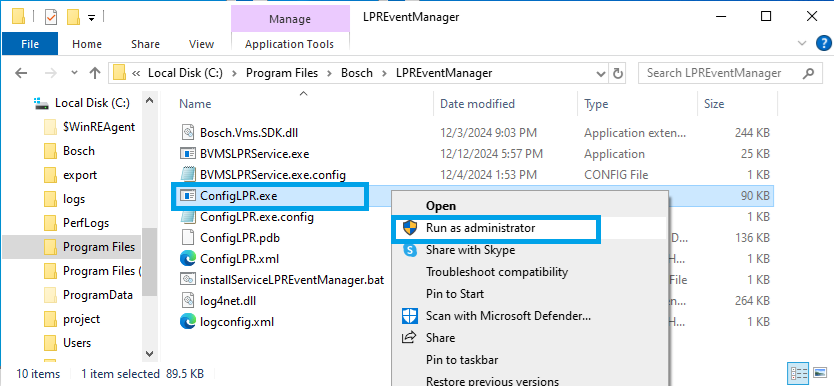
Copy the software files into the 'C:\Program Files\Bosch\LPREventManager\' directory.
Go to the software directory 'C:\Program Files\Bosch\LPREventManager\' and run 'ConfigLPR.exe' with elevated rights (Run as administrator).
Important:
When you start the software for the first time, it must be started with administrator rights so that the SQL database is created!
It is recommended to start the software always with elevated rights (Run as administrator), so that services can be restarted even after changing the configuration. The configuration only needs to be saved if something changes to the BVMS settings.
First start file 'ConfigLPR.exe' with administrator-rights
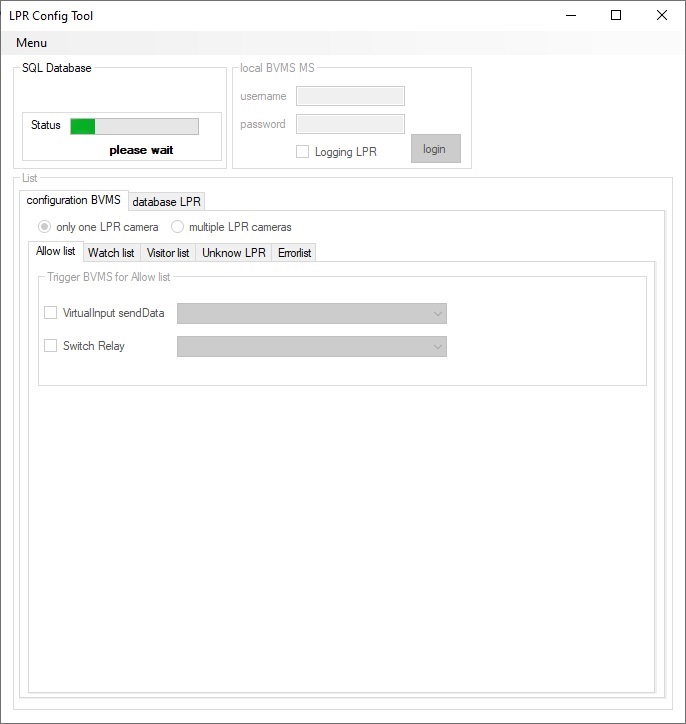
If the status states 'please wait' for a longer period of time, then the database will be created.
Once the database has been created successfully, the status displays 'OK':
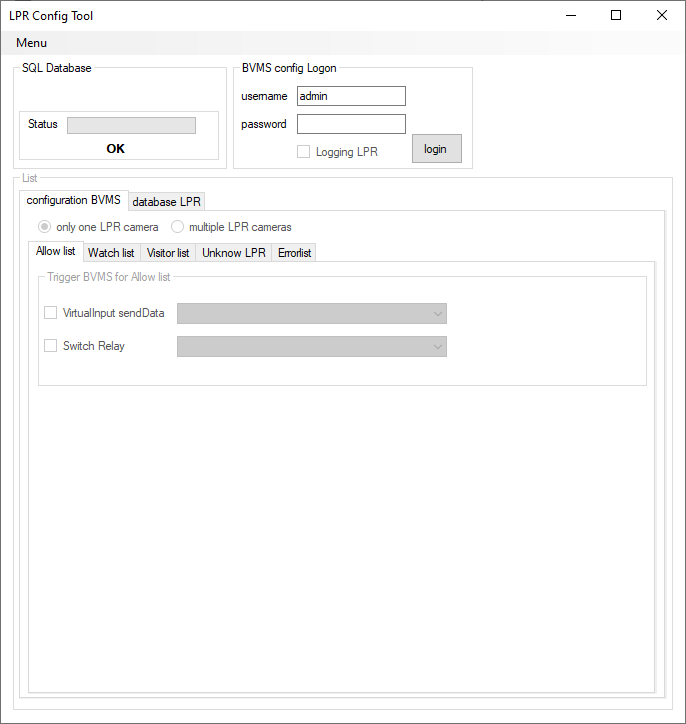
Configure BVMS credential for access to BVMS events and 'Virtual Input' and/or 'Relay'.
Insert BVMS username and password for authentication and click the button 'login'.
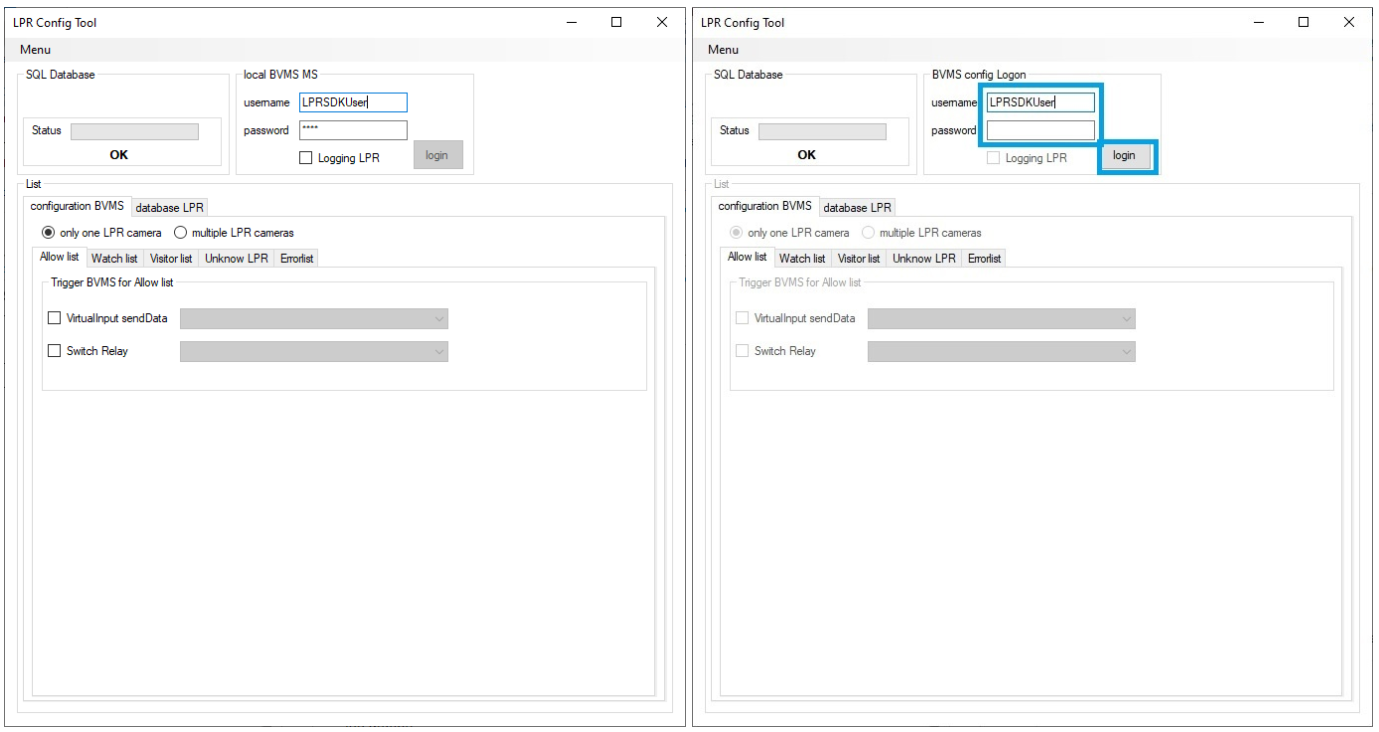
The BVMS username and password are also used as the login for an existing configuration. The username and password are always used when saving the configuration!
If the username or password has been changed on the BVMS, the old username and password are used to open the configuration. You must then log in to the BVMS with the new username and password. Then, save the configuration, and the new username and password are saved for the configuration.
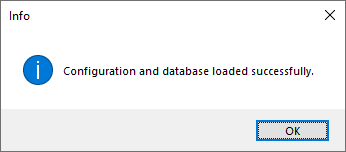
If BVMS connects successfully, then above message is presented. In case a connection is not possible, please check the BVMS credentials.
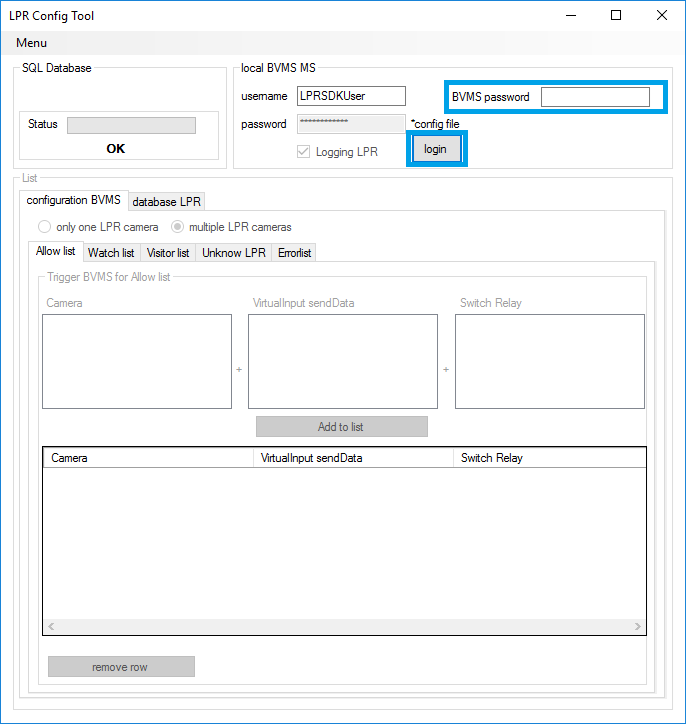
For improved handling of different passwords between the password in the config file and the BVMs connection. This is created with LPR config tool version 1.0.0.29.
New feature by change BVMS password.
-
Insert the config file password
-
If the BVMS connection not possible because BVMS has a different password:
-
insert the BVMS password
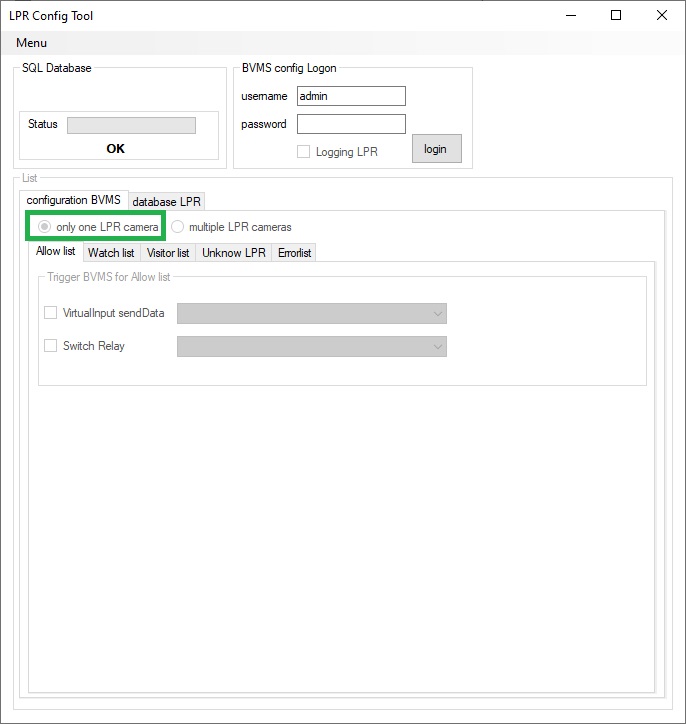
If only one LPR camera is present or only one trigger is used for all LPR cameras, please select mode "only one LPR camera".
If multiple LPR cameras are used with different triggers, please select mode "multiple LPR cameras".
Mode 'only one LPR camera'
Mode 'multiple LPR cameras'
Now the trigger output can be configured in e.g. 'Allow list':
Mode 'only one LPR camera'
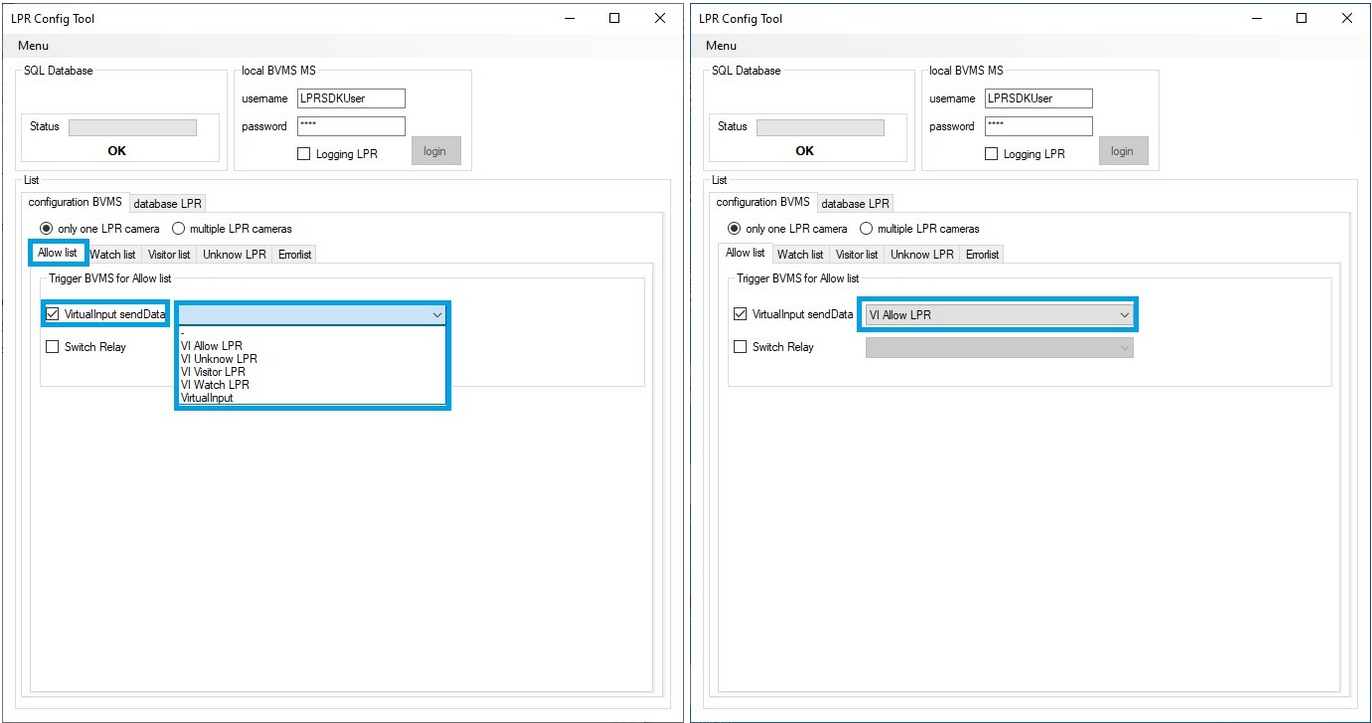
This means that if a license plate has been detected and is included in the 'Allow list', then the 'VirtualInput sendData' is triggered and the license plate is passed as text.
Additionally also a relay can be switched (closed for one second).
If multiple lists are used, this process must be repeated for the other lists. Create trigger output for each list.
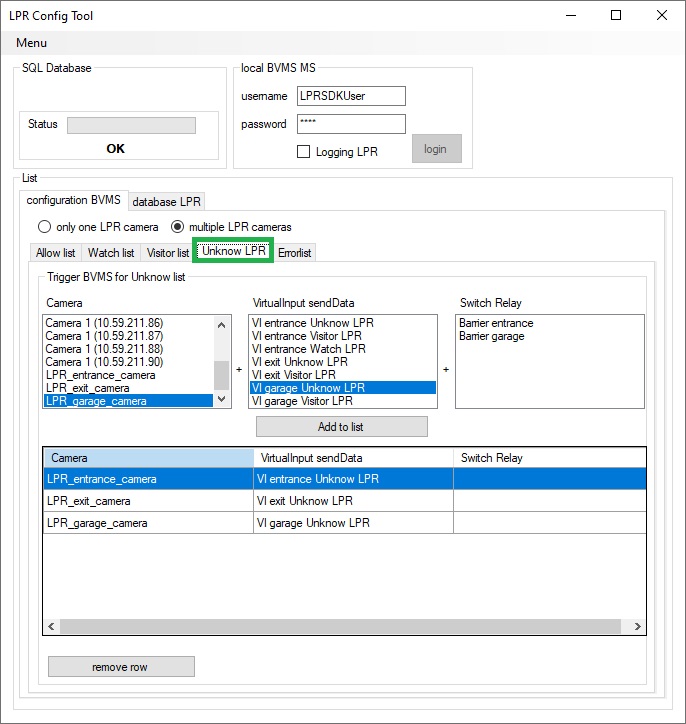
Mode 'multiple LPR cameras'
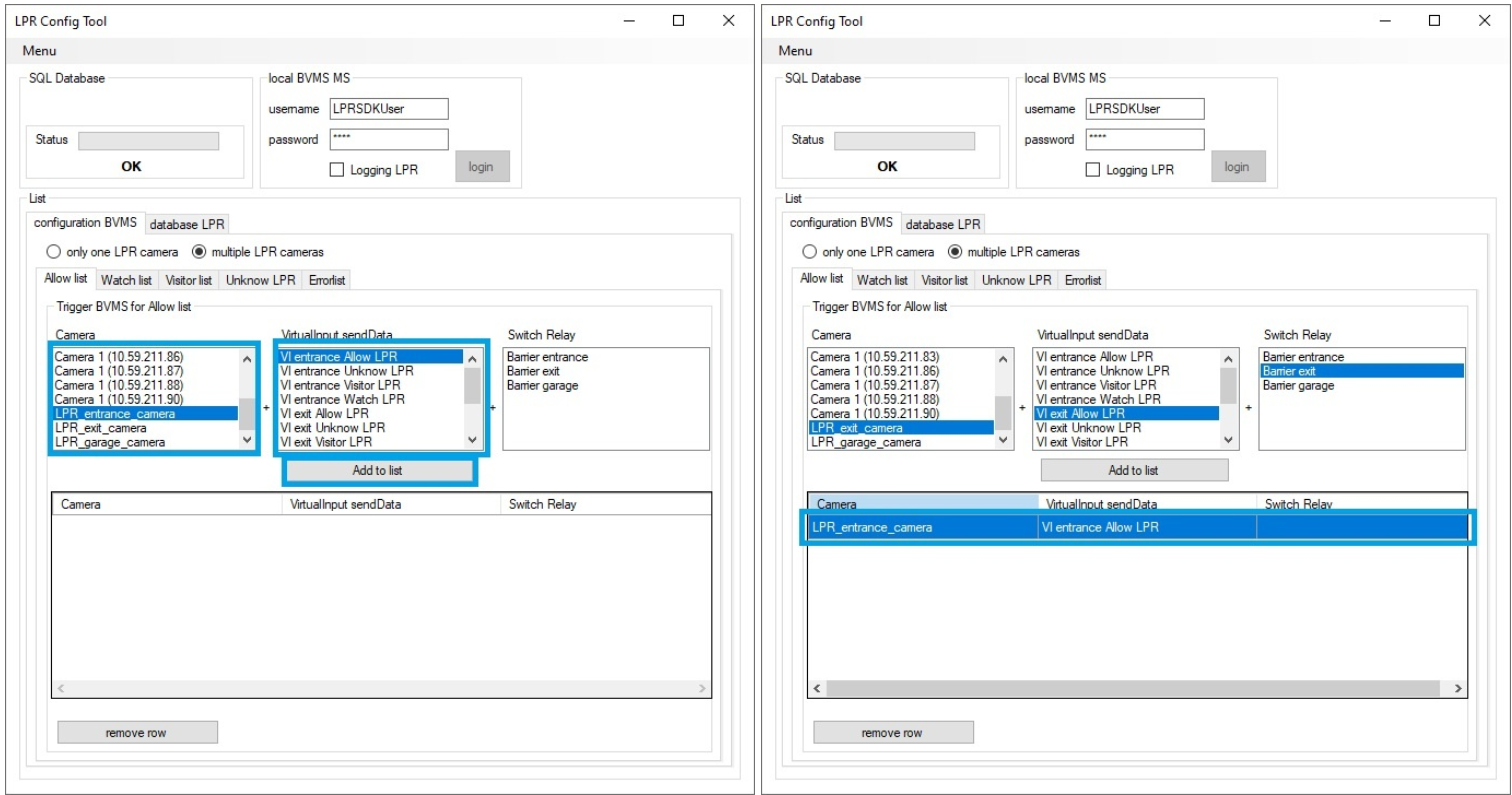
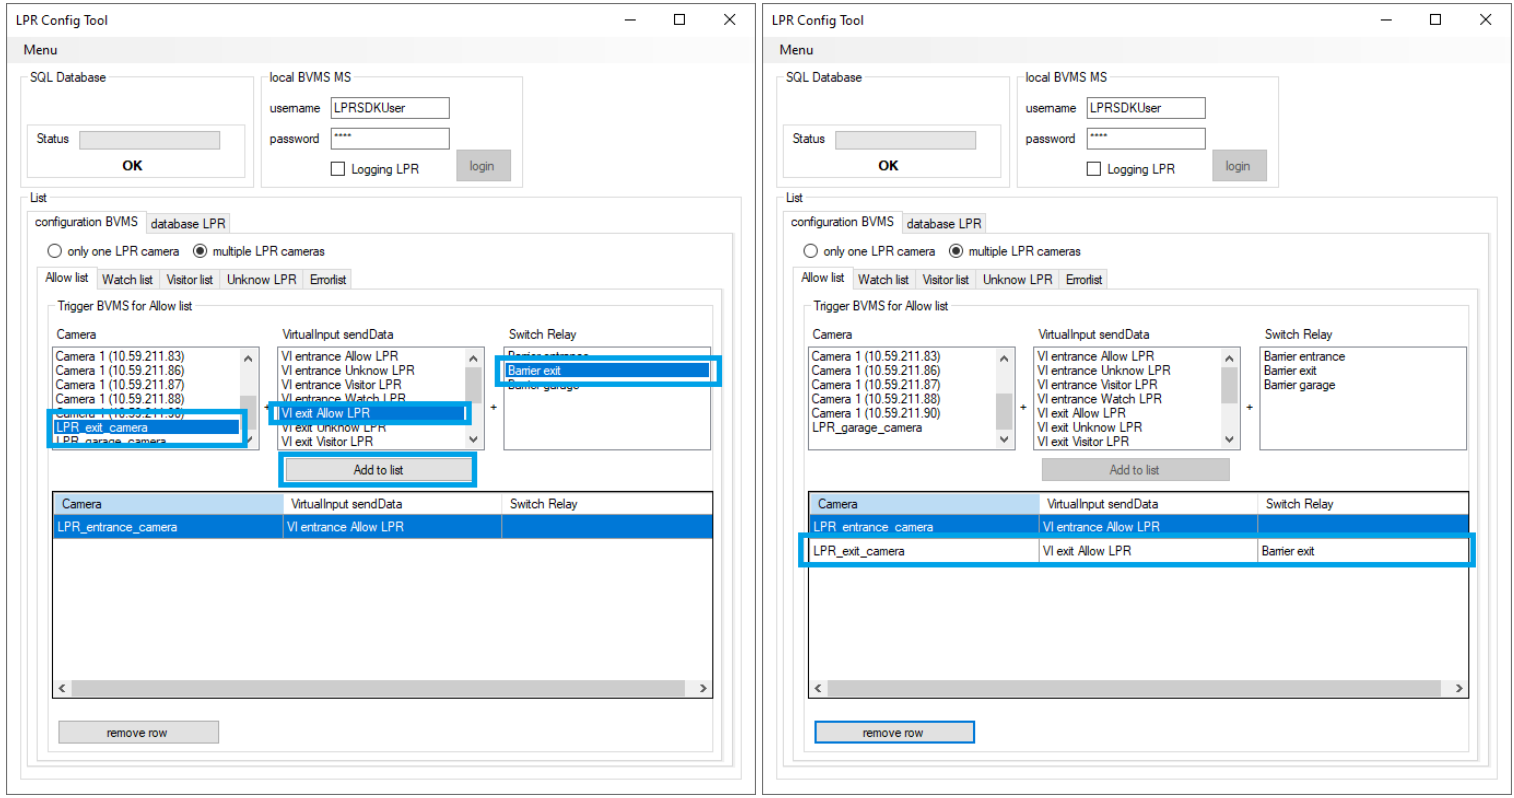
This means that if a license plate has been detected and is included in the 'Allow list', then the 'VirtualInput sendData' is triggered and the license plate is passed as text.
Additionally also a relay can be switched (closed for one second).
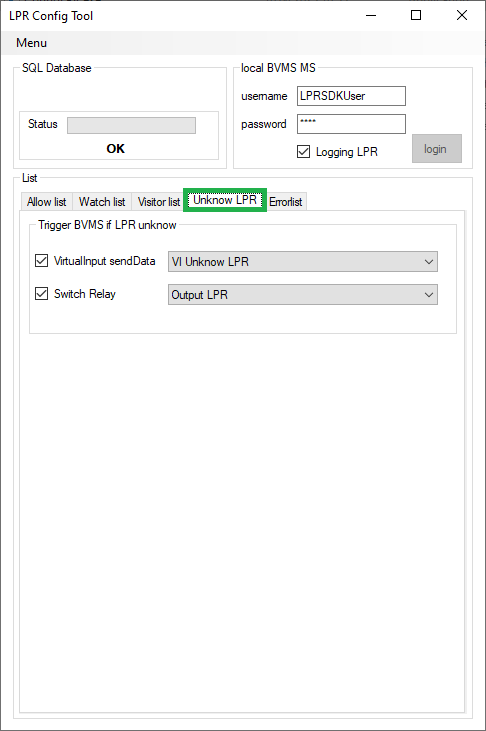
3.1.1. New feature from version 6: All unknown LPRs can trigger an event:
Mode 'only one LPR camera' (screenshot from old version!)
Mode 'multiple LPR cameras'
Important: Configuration must be saved.
The configuration includes the BVMS login data and triggering. This data will be required by the service later!

Tool is running with administrator-rights:
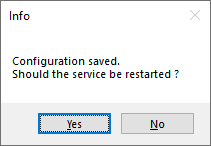
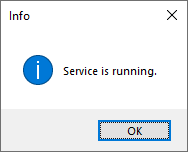
If click 'Yes', then show delayed this message:
Tool is running without administrator-rights:
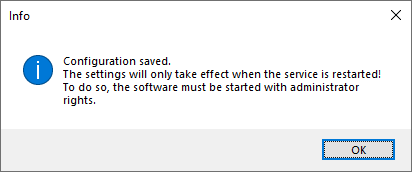
Configuration is saved in an encrypted file.
If changes are made to the BVMS settings, then the configuration must be adjusted and saved again. The service must then always be restarted so that the configuration data is reloaded.
Username and password are also saved and are required to open the configuration!
3.2. Configuration changes during ongoing operation
If the system is in use and the configuration is changed later, the service must be restarted to adopt the new configuration. There are two ways to start the service:
Notes:
If the config tool is started with administrator rights, you will automatically be asked after saving whether you want to restart the service. Confirming this message will restart the service and indicate when the service is running again with a message box.
|
Options |
Description |
|---|---|
|
Start the 'LPR Config Tool' with elevated rights ('ConfigLPR.exe' run as Administrator). After the configuration was changed, the service must be stopped and started again: Service stop: 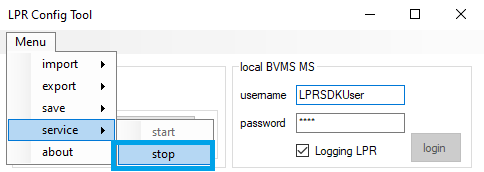
Service start: 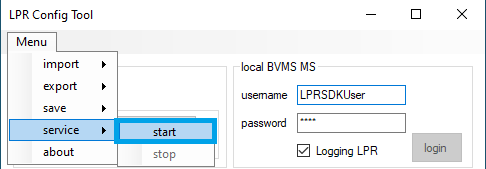
|
|
Open Services and select the LPRservice. Then use menu buttons to stop and restart this service. 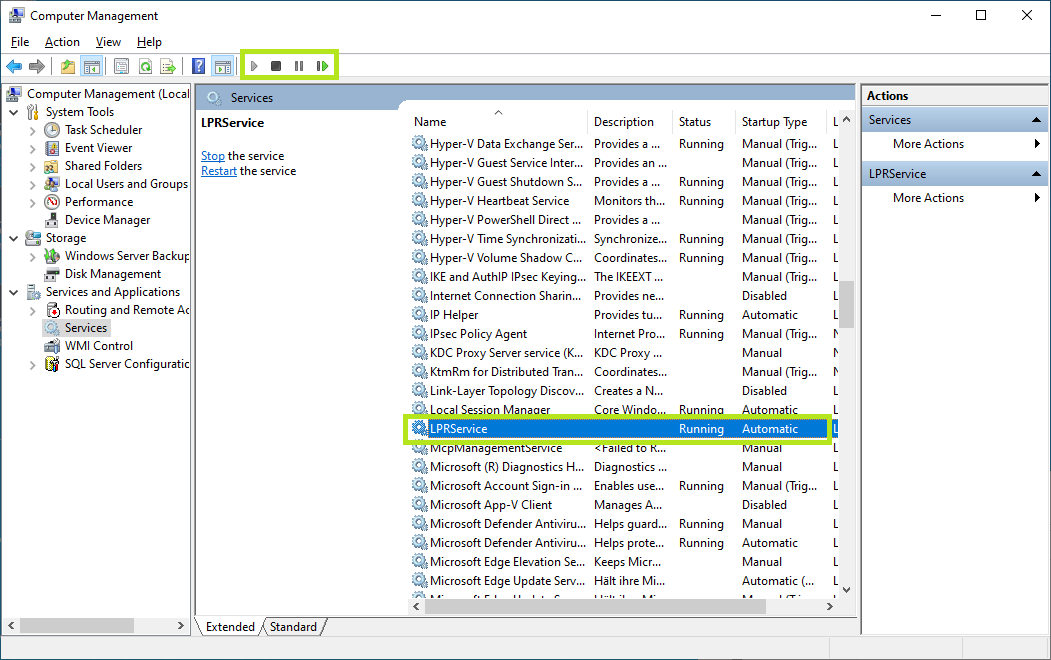
|
3.3. Manage license plate lists
'Allow list', 'Watch list', 'Visitor list':
3.3.1. Create lists
⚠ Note: Screenshots from an older version are used here.
Add license plates to the database. E.g. add LPR in 'Allow list':
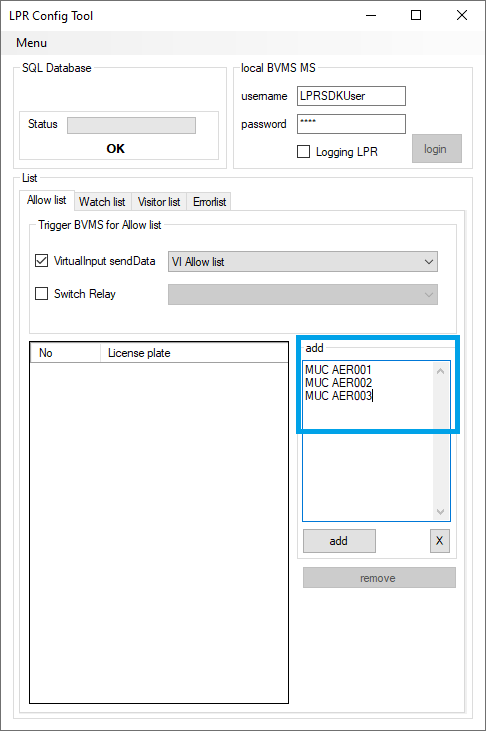
Insert license plate into textbox.
If several license plates should be inserted in parallel, they they must be entered with a line break as shown in above screenshot.
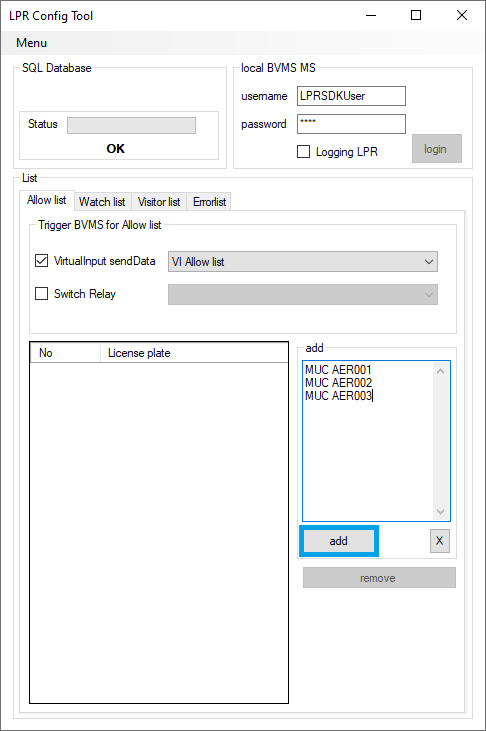
The license plates are stated in the text box only temporarily, e.g. for verification purposes. The information can still be changed in the text box. Only after pressing 'add' button the data will be written into the database!
With clicking on 'add' button, the following message box appears:
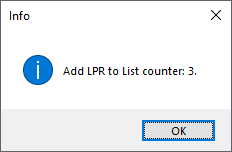
Information inserted in the database:

If multiple lists are used, this process must be repeated for the other lists. Create the licenses plate database for each list.
⚠ Important: only a specific license plate can be entered in all list.
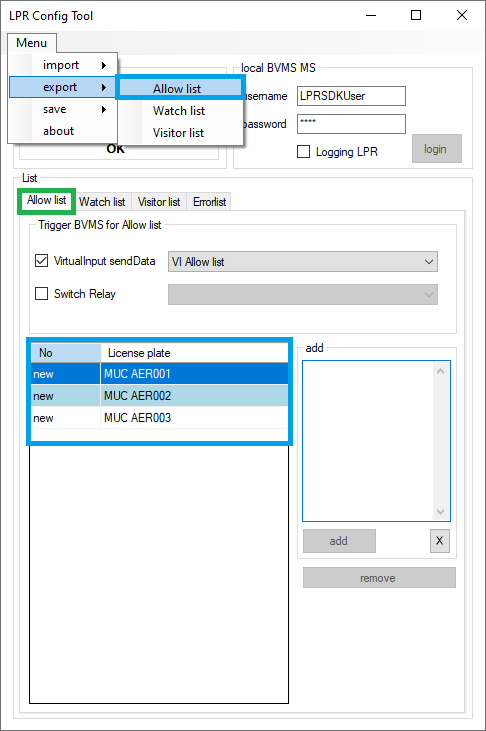
3.3.2. Export list
Lists can be exported individually and imported later again. It is recommended to export the lists to have a backup.
E.g. export 'Allow list' ( ⚠ Note: Screenshots from an older version are used here.):
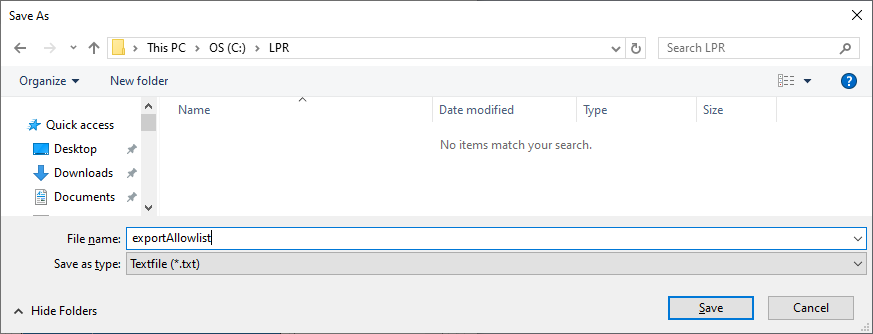
Select folder and enter a filename:
Sample export file data:

All created license plates are contained unencrypted in this text file and can also be edited with a text editor.
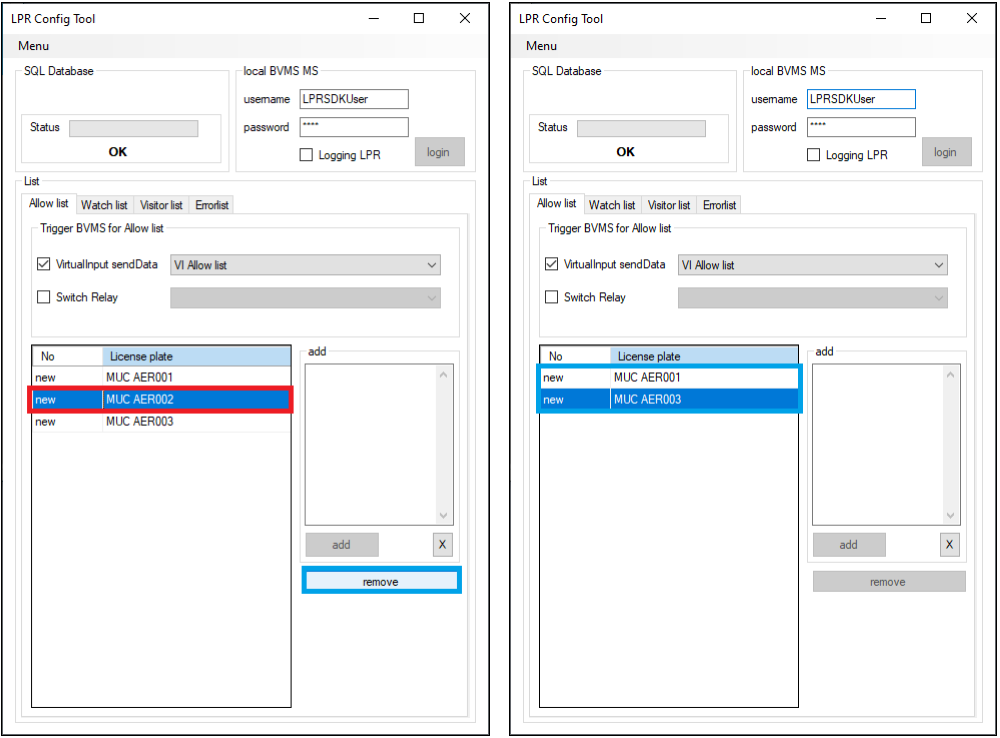
3.3.3. Import list
⚠ Note: Screenshots from an older version are used here.
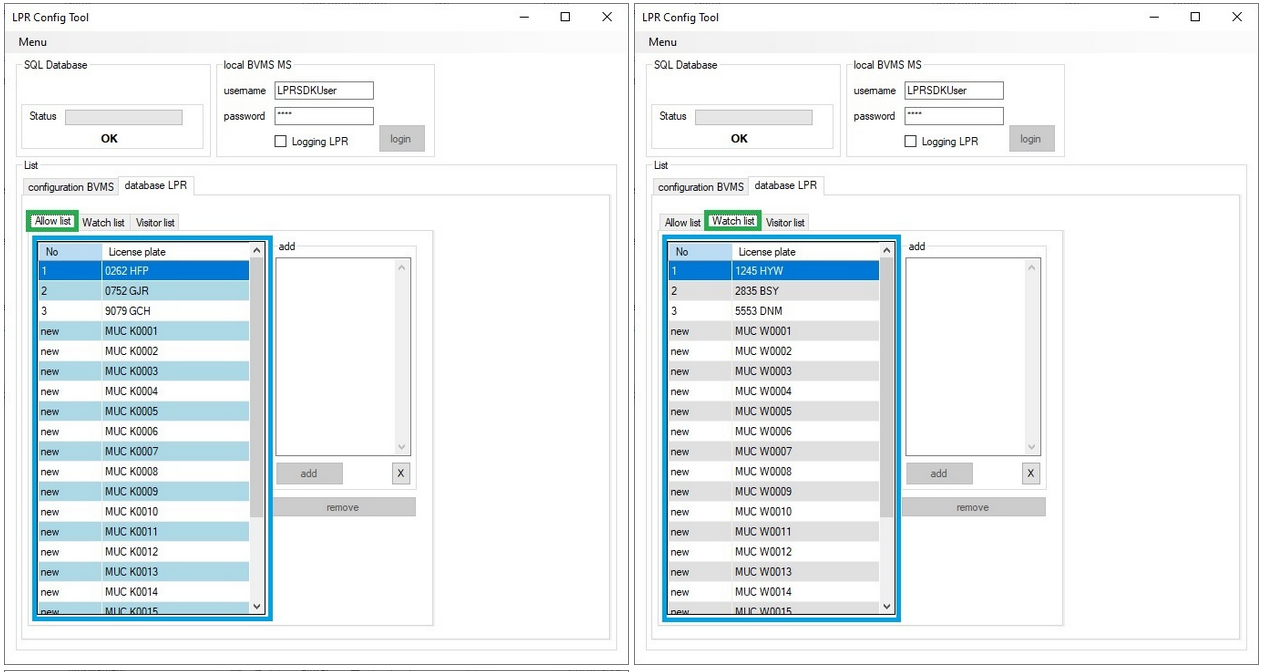
Loading an exported list.
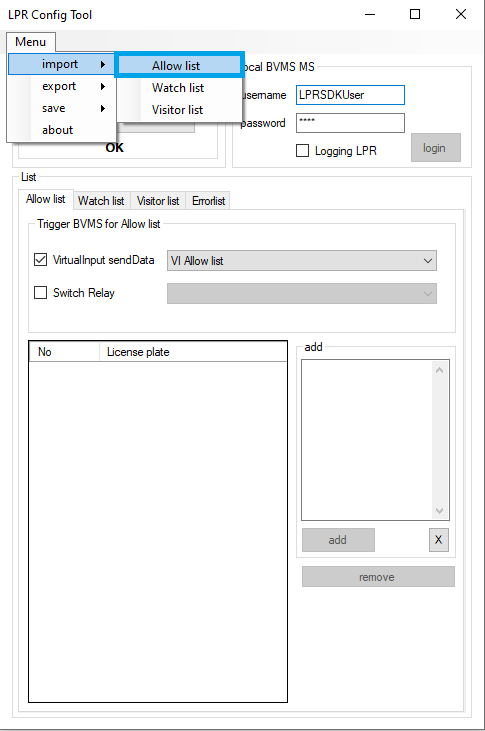
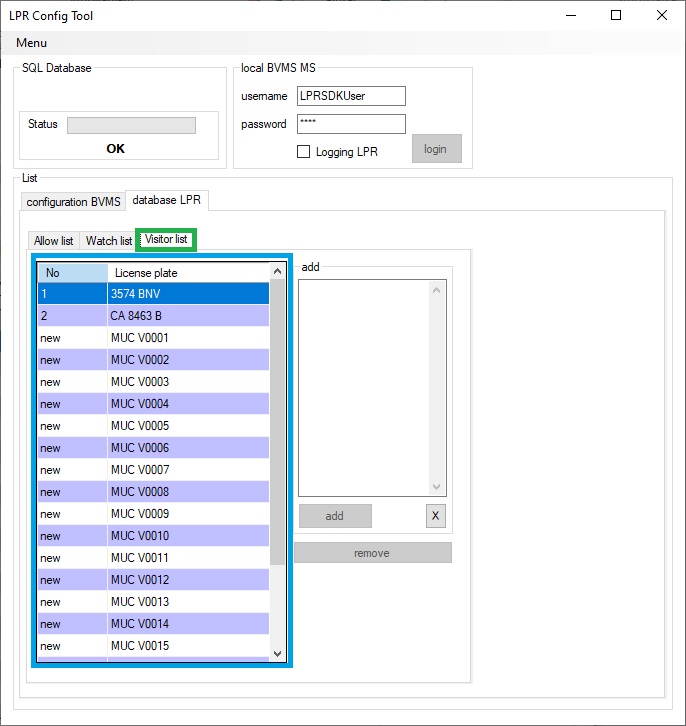
Select where the list should be imported. E.g. 'Allow list'.
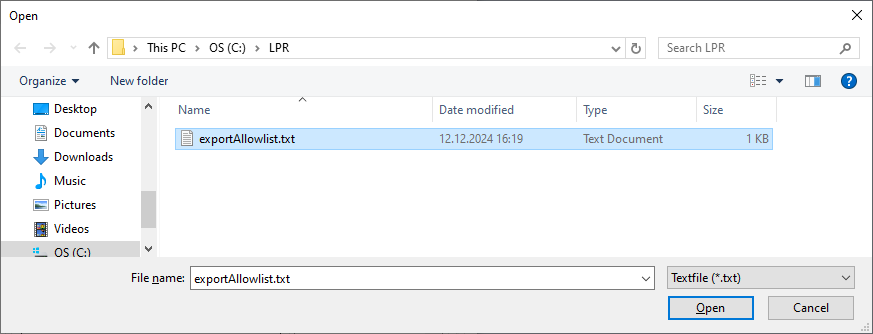
Select the file for import.
All license plates from the imported file are temporarily inserted into the text box of the selected list. They still can be edited.
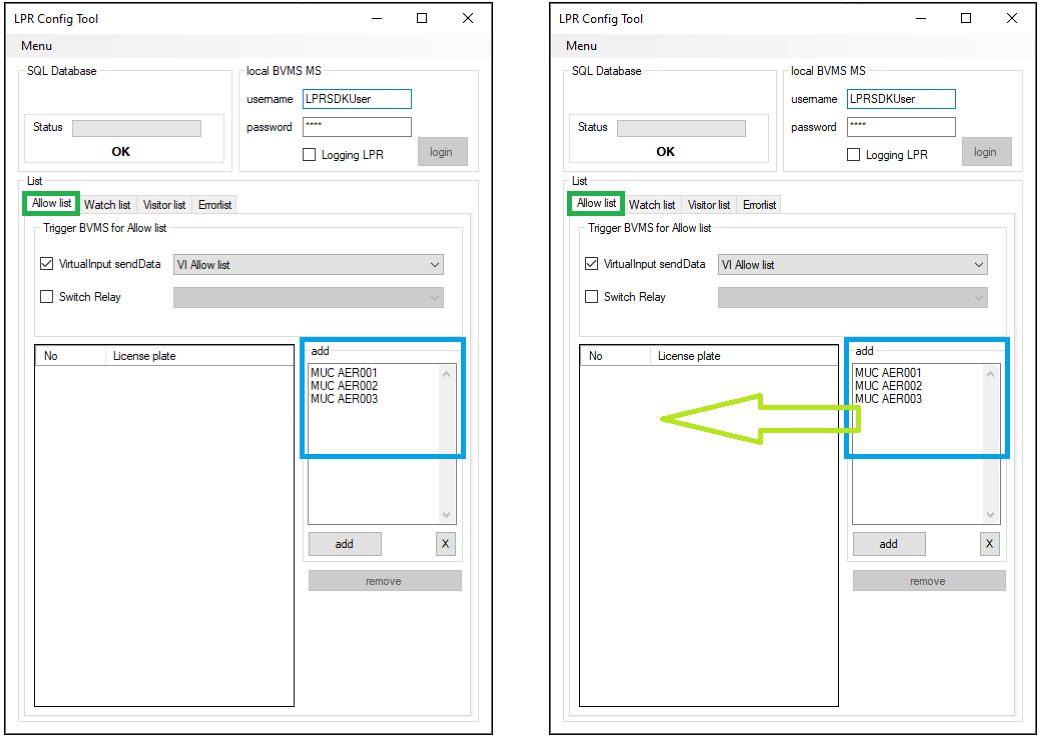
Important: Ensure that the tab of the corresponding list is selected, before adding the license plate numbers (Above screenshot with green border).
If the license plates will be written into the database by pressing the 'add' button. Now it is checked whether the new license plates are already in the database. They will be inserted, if still not available. In case a license plate already exists in the database, then it will not be inserted (regardless of which list/database the license plate contained in).

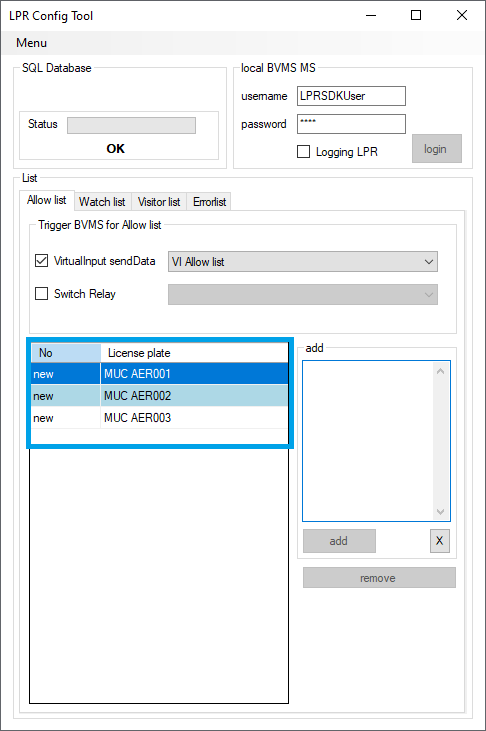
In case all license plates are new, they will be inserted to the database as shown in next screenshot:
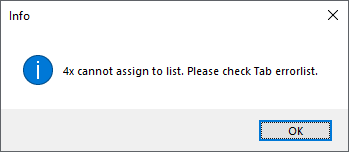
License plate already exists in database:
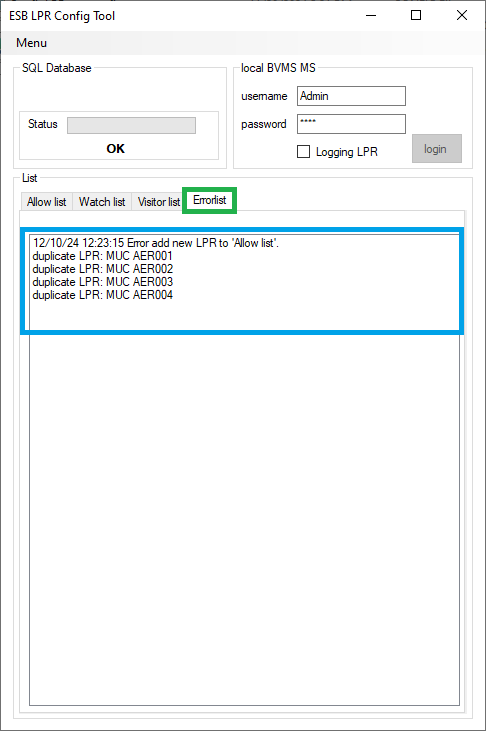
Message, if license plates already exists in the list, the following error occurs:
Error details:
3.3.4. Remove license plate from list
⚠ Note: Screenshots from an older version are used here.
To delete a license plate from the database, select one or multiple license plates click on 'remove' button.
4. Service registration
Once the database has been created and a configuration has been saved, the service can be installed and started.
Go to the software directory 'C:\Program Files\Bosch\LPREventManager\' and run 'installServiceLPREventManager.bat' with elevated rights (Run as administrator):

Check that the service is running and that the configuration has been loaded and a connection to BVMS established.
Check also the logfiles from the service:
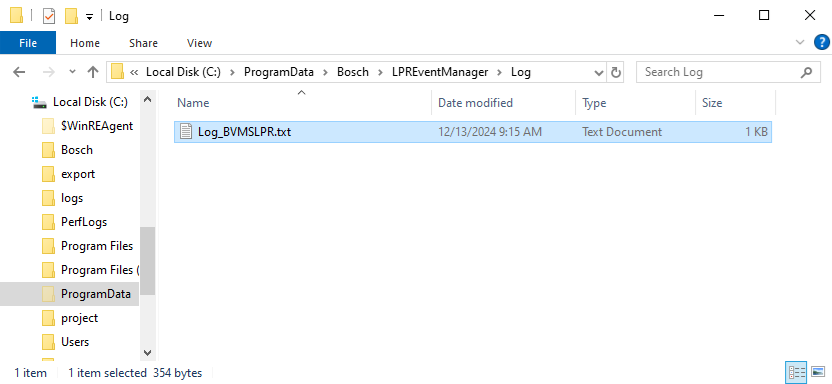
Open the log file with editor:
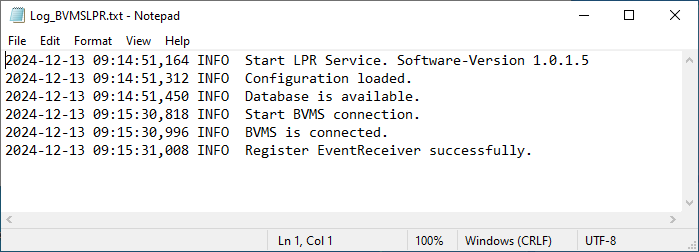
Above shown screenshots shows a successful registration and start of the service.
In case the log file shows errors or no entries, then check whether the service is installed and started:
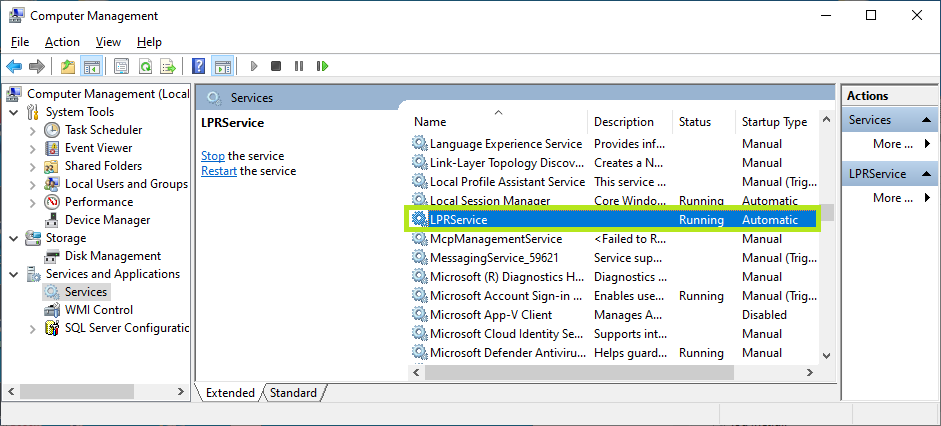
Verify that the service with name 'LPRService' has the status: 'Running' and Start Type: 'Automatic'.
Important: Whenever the configuration is changed, the service must be restarted!
5. BVMS settings
Configuration VirtualInputs or Relay for triggering.
E.g. configure 'VirtualInputs':
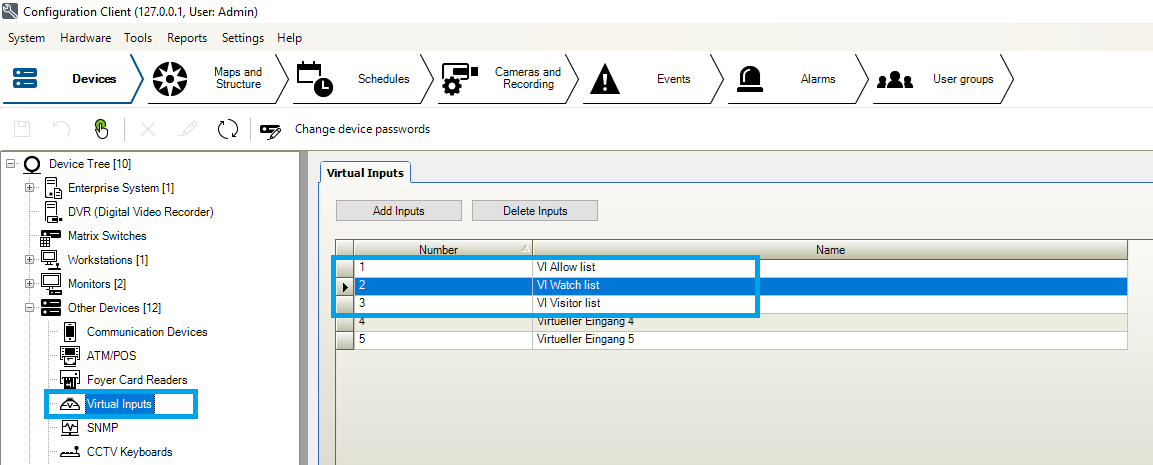
Create a BVMS 'Event' from 'Virtual Input Data':
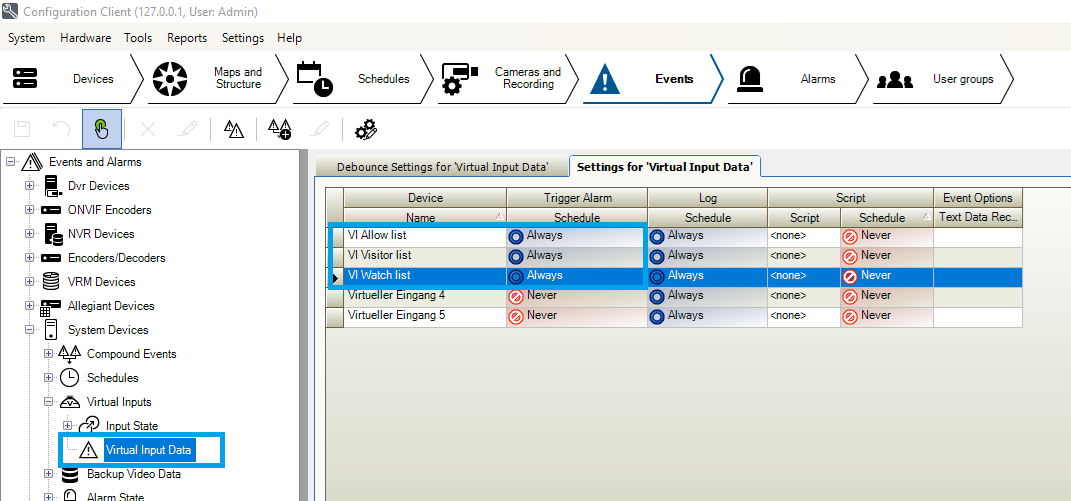
This 'Event' can trigger from the LPR software tool. Please configure the 'VirtualInput' as shown in the screenshot. In 'Virtual Input Data' is used for LPR.
Via 'Event' and 'Alarm tabs alarms can be created for BVMS.
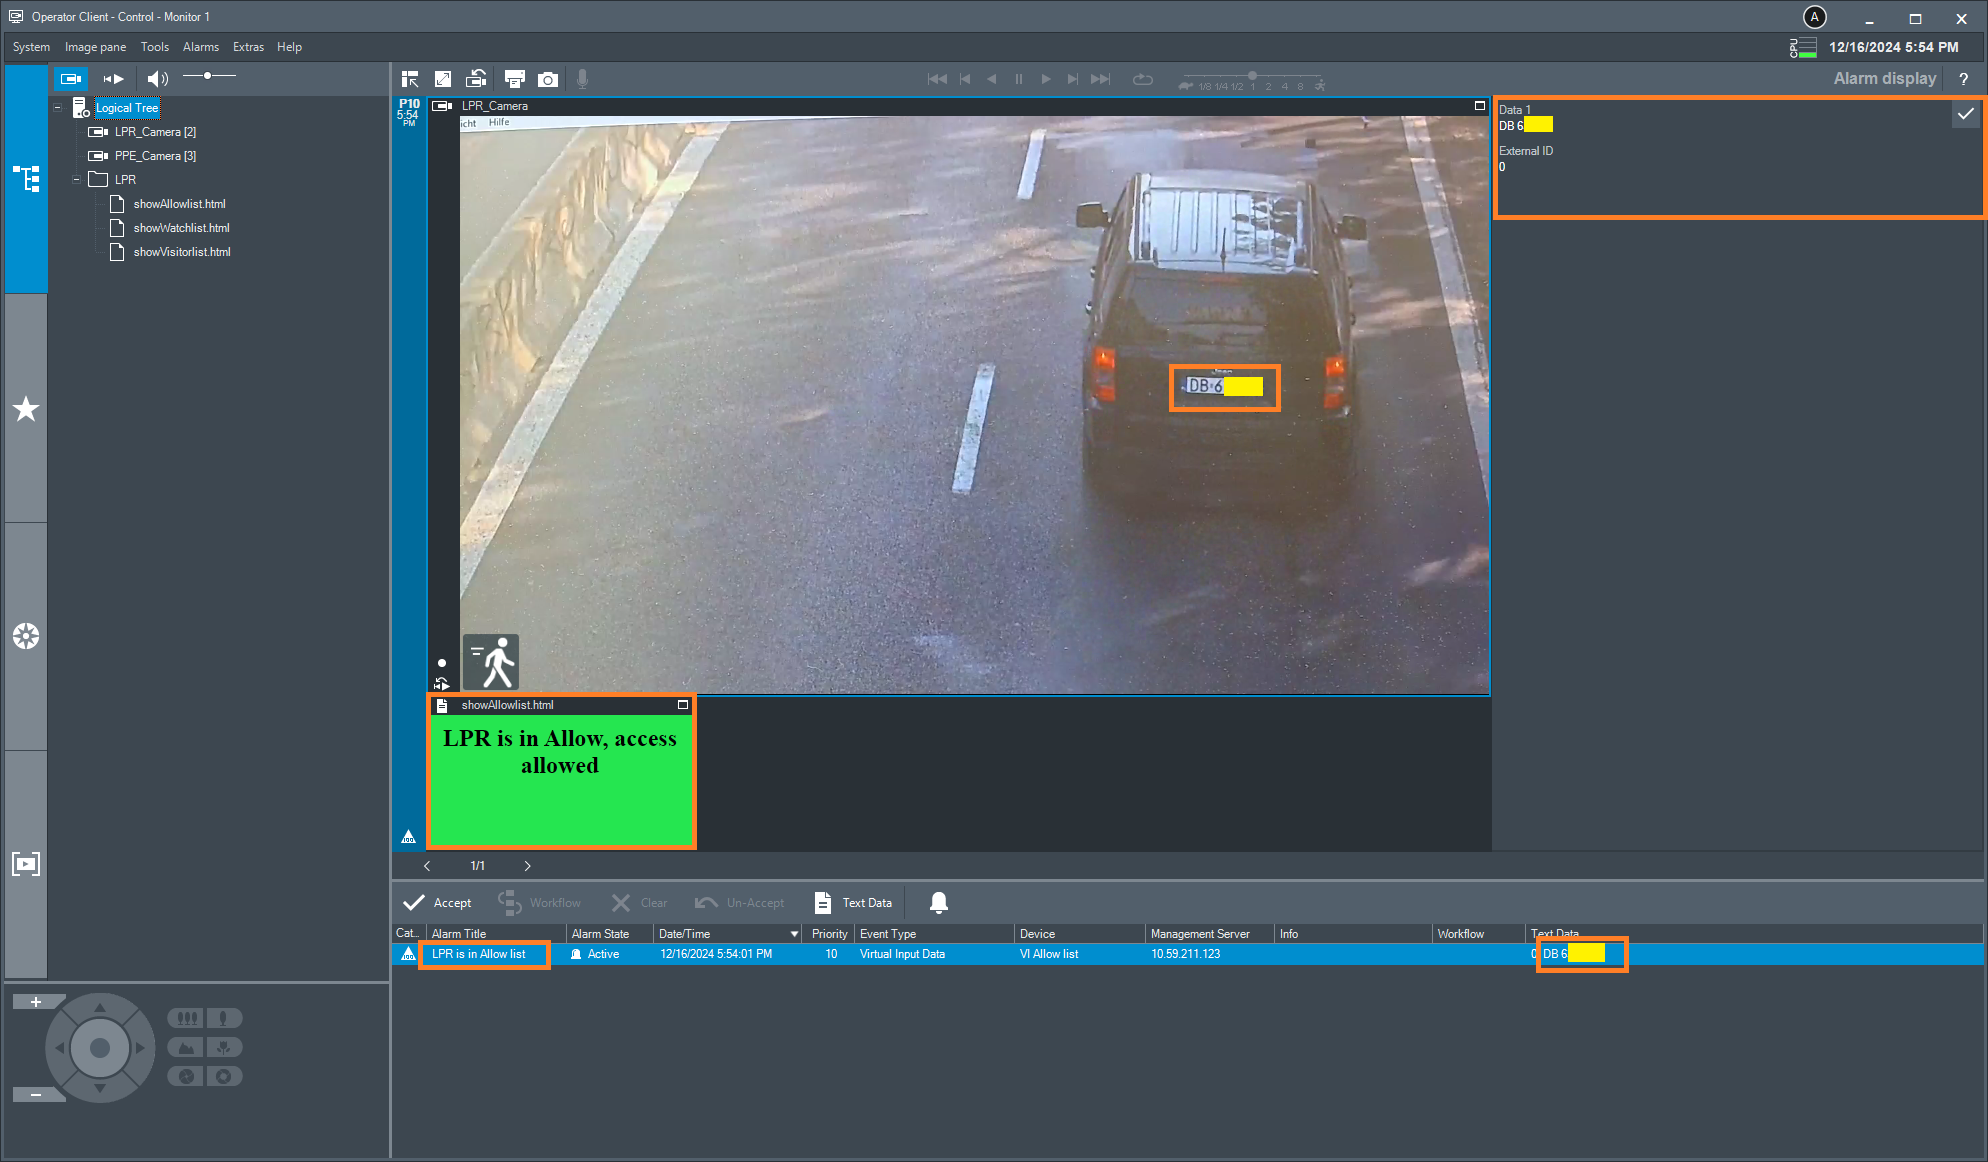
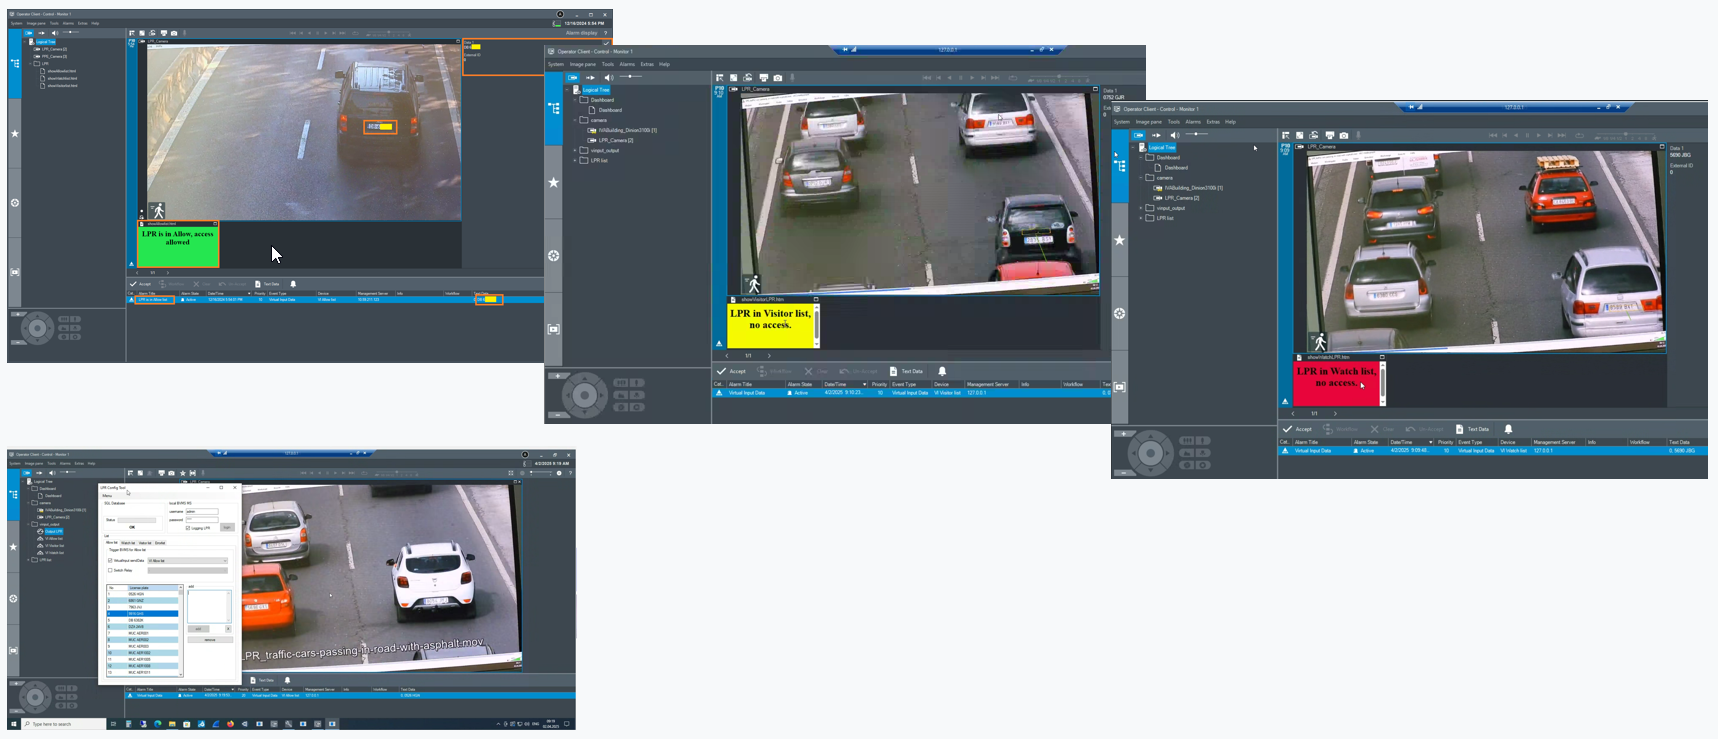
5.1. BVMS shows LPR Alarm
Example:
5.2. Additional information
The log files must be evaluated for error analysis (folder 'C:\ProgramData\Bosch\LPREventManager\Log\').
If the service loses connection to the BVMS (maybe due to a configuration change), then a new connection will be attempted after 30 seconds. This is viewing in the logfiles.
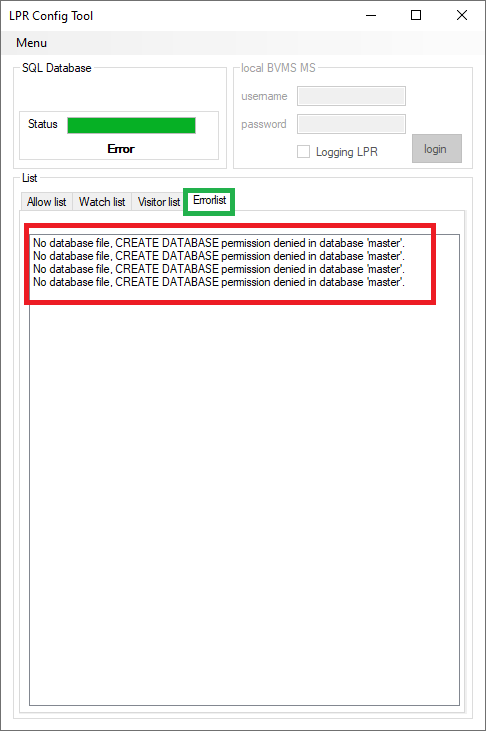
5.2.1. Error case
If the following error is visible during the initial start phase, then please check whether the software was started with elevated rights (Runs as Administrator). If so, please check whether the software was running on a machine with BVMS Management Server installed on:
5.2.2. Logfiles
There are two different types of logging.
The service writes data to a specific log file, and the config tool writes to a different log file. Log files are located at C:\ProgramData\Bosch\LPREventManager\Log, and the service log file is 'Log_BVMSLPR.txt', while the config tool logs to 'Log_LPRConfig.txt'.